


The most recent version of this page is a draft. This version is outdated by a newer approved version.This version (16 Aug 2021 17:41) was approved by Stefan-Robert Raus.The Previously approved version (13 Aug 2021 03:24) is available.
This version is outdated by a newer approved version.This version (16 Aug 2021 17:41) was approved by Stefan-Robert Raus.The Previously approved version (13 Aug 2021 03:24) is available.This is an old revision of the document!
Table of Contents
AD-FMC-SDCARD for Zynq & Altera SoC Quick Start Guide
The AD-FMC-SDCARD or AD-FMC-SDCARD is an microSD Card and SD Card adapter (to use the Micro SD Card in an SD Card Slot), pre-formatted with an ADI supported Linux image on it, which can be used for looking at a variety of ADI boards which is compatible with Raspberry Pi, Xilinx Zynq & Zynq UltraScale+ and Intel SoC platforms.
If you have a preformatted SD Card (one that normally comes with one of the ADI FMC Cards), you can skip down to the Preparing the image section. You still will need to do some manual configuration, since the SD Card supports different base platforms, and different FMC Cards.
You will also need to update the image, since the pre-formatted image will be 6 or more months old, and issues have been fixed since then.
This guide provides some quick instructions (still takes awhile to download, and set things up) on how to setup the ADI Linux distribution for Xilinx Zynq and run them on either:
Requirements
- You need a Host PC (Windows or Linux).
- You need a SD card writer connected to above PC (Supported USB SD readers/writers are OK).
- USB keyboard/mouse for the Zynq Device
- HDMI Display (monitor or TV)
Download Linux Image
The BOLD is what you should type. It's not too much more than Special Agent Oso's three special steps, and it also allows you to go for that specialty coffee you have been craving.
For different platforms you'll need different images. Currently we provide a single pre-build images, that can work on all the platforms we support.
Make sure you unzip the image using either 7-zip or on Linux it can be done via command-line xz -d 2018_R2-2019_05_23.img.xz. The actual file that needs to be dumped to the SD card has to have the *.img extension.
Your SD-card needs to be at least 16 GB for releases 2019-R2 and newer. Or 8 GB for older releases.
If your computer has security restrictions imposed by your company's IT department, which prevent your from writing data to SD-cards (or the data is encrypted when written on the SD-card), then consider using a computer that doesn't have such restrictions, or communicating with your IT department to find a solution.
- 28 July 2021 release candidate (2019_R2)
- Checksum image_2021-07-28-ADI-Kuiper-full.zip
279097240dec7156ff5e15b7ce0b8a25 - Checksum 2021-07-28-ADI-Kuiper-full.img
b160453396e482234094a92134769ec6
- 23 February 2021 release candidate (2019_R2)
- Checksum 2021-02-23-ADI-Kuiper.img.xz
4e2d2d290f6c55666a91246afb42d6c8 - Checksum 2021-02-23-ADI-Kuiper.img
f5dcc9a192ef4597d73d532046320306
- 22 June 2020 release (2019_R1)
- Checksum 2019_R1-2020_06_22.img.xz
6ac6fc0733baba361acb66bd4cb050be - Checksum 2019_R1-2020_06_22.img
3135f400387c39f29dc877e68636a875
- 04 February 2020 release (2019_R1 RC)
- Checksum 2019_R1-2020_02_04.img.xz
49c121d5e7072ab84760fed78812999f - Checksum 2019_R1-2020_02_04.img
40aa0cd80144a205fc018f479eff5fce
- 23 May 2019 release (2018_R2)
- Checksum 2018_R2-2019_05_23.img.xz
c377ca95209f0f3d6901fd38ef2b4dfd - Checksum 2018_R2-2019_05_23.img
59c2fe68118c3b635617e36632f5db0b
Now, depending if you are using Linux or Windows, follow these instructions to write the file to your 8 Gig SD card.
Preparing the image
If your computer has security restrictions imposed by your company's IT department, which prevent your from writing data to SD-cards (or the data is encrypted when written on the SD-card), then consider using a computer that doesn't have such restrictions, or communicating with your IT department to find a solution.
The SD card includes a few images on it's BOOT partition. One of these images needs to be selected before the system will boot properly. In order to run any of these images, just copy the images from the subdirectory into the base directory, and then boot it. For newer versions of the SD card, uImage (Image for ZynqMP) files are in subdirectories for FPGA board generation. Be sure to move the correct uImage (Image for ZynqMP) into the root of the BOOT partition as well. So the root of 'BOOT' should contain:
- An uImage file or Image file for ZynqMP
- A BOOT.BIN specific to your board+FPGA
- A devicetree.dtb or system.dtb for ZynqMP specific to your board+FPGA
If you notice that the file/board you want isn't in your actual SD-Card, that's because you need to upgrade it first. Just pick something with the same base board, boot it, and then run the update scripts, and then copy the right files to the BOOT partition.
Supported images include:
| Directory on the SD image | Carrier | On Carrier Devices | Add on card | doc |
|---|---|---|---|---|
| socfpga_arria10_socdk_ad9172_fmc | DK-SOC-10AS066S-A | EVAL-AD9172 | ||
| socfpga_arria10_socdk_adrv9009 | DK-SOC-10AS066S-A | EVAL-ADRV9008-9009 | doc | |
| socfpga_arria10_socdk_adrv9371 | DK-SOC-10AS066S-A | EVAL-ADRV9371 | doc | |
| socfpga_arria10_socdk_daq2 | DK-SOC-10AS066S-A | AD-FMCDAQ2-EBZ | doc | |
| socfpga_arria10_socdk_fmclidar1 | DK-SOC-10AS066S-A | AD-FMCLIDAR1-EBZ | doc | |
| socfpga_cyclone5_sockit_arradio | Intel Cyclone 5 SoC Kit | Arradio board | ||
| zynq-adrv9361-z7035-bob | ADRV1CRR-BOB | ADRV9361 | doc | |
| zynq-adrv9361-z7035-bob-cmos | ADRV1CRR-BOB | ADRV9361 | doc | |
| zynq-adrv9361-z7035-fmc | ADRV1CRR-FMC | ADV7511 | doc | |
| zynq-adrv9361-z7035-packrf | ADRV-PACKRF | ADRV9361 | doc | |
| zynq-adrv9364-z7020-bob | ADRV1CRR-BOB | ADRV9364 | doc | |
| zynq-adrv9364-z7020-bob-cmos | ADRV1CRR-BOB | ADRV9364 | doc | |
| zynq-adrv9364-z7020-packrf | PackRF | ADRV9364 | doc | |
| zynqmp-adrv9009-zu11eg-revb-adrv2crr-fmc-revb | ADRV2CRR-FMC | ADRV9009-ZU11EG | doc | |
| zynqmp-zcu102-rev10-ad9172-fmc-ebz-mode4 | ZCU102 | EVAL-AD9172 | ||
| zynqmp-zcu102-rev10-ad9361-fmcomms2-3 | ZCU102 | AD-FMCOMMS2-EBZ or AD-FMCOMMS3-EBZ | doc or doc | |
| zynqmp-zcu102-rev10-ad9361-fmcomms5 | ZCU102 | AD-FMCOMMS5-EBZ | doc | |
| zynqmp-zcu102-rev10-ad9364-fmcomms4 | ZCU102 | AD-FMCOMMS4-EBZ | doc | |
| zynqmp-zcu102-rev10-adrv9002 | ZCU102 | ADRV9002NP/W1/PCBZ ADRV9002NP/W2/PCBZ | doc | |
| zynqmp-zcu102-rev10-adrv9008-1 | ZCU102 | EVAL-ADRV9008-9009 | doc | |
| zynqmp-zcu102-rev10-adrv9008-2 | ZCU102 | EVAL-ADRV9008-9009 | doc | |
| zynqmp-zcu102-rev10-adrv9009 | ZCU102 | EVAL-ADRV9008-9009 | doc | |
| zynqmp-zcu102-rev10-adrv9371 | ZCU102 | ADRV9371 | doc | |
| zynqmp-zcu102-rev10-adrv9375 | ZCU102 | ADRV9375 | doc | |
| zynqmp-zcu102-rev10-fmcdaq2 | ZCU102 | AD-FMCDAQ2-EBZ | doc | |
| zynqmp-zcu102-rev10-fmcdaq3 | ZCU102 | eval-fmcdaq3-ebz | doc | |
| zynqmp-zcu102-rev10-fmclidar1 | ZCU102 | AD-FMCLIDAR1-EBZ | doc | |
| zynq-zc702-adv7511 | ZC702 | ADV7511 | ||
| zynq-zc702-adv7511-ad9361-fmcomms2-3 | ZC702 | ADV7511 | AD-FMCOMMS2-EBZ or AD-FMCOMMS3-EBZ | doc or doc |
| zynq-zc702-adv7511-ad9361-fmcomms5 | ZC702 | ADV7511 | AD-FMCOMMS5-EBZ | doc |
| zynq-zc702-adv7511-ad9364-fmcomms4 | ZC702 | ADV7511 | AD-FMCOMMS4-EBZ | doc |
| zynq-zc706-adv7511 | ZC706 | ADV7511 | ||
| zynq-zc706-adv7511-ad6676-fmc | ZC706 | ADV7511 | EVAL-AD6676 | |
| zynq-zc706-adv7511-ad9172-fmc-ebz | ZC706 | ADV7511 | ||
| zynq-zc706-adv7511-ad9265-fmc-125ebz | ZC706 | ADV7511 | AD9265-FMC-125EBZ | |
| zynq-zc706-adv7511-ad9361-fmcomms2-3 | ZC706 | ADV7511 | AD-FMCOMMS2-EBZ or AD-FMCOMMS3-EBZ | doc or doc |
| zynq-zc706-adv7511-ad9361-fmcomms5 | ZC706 | ADV7511 | AD-FMCOMMS5-EBZ | doc |
| zynq-zc706-adv7511-ad9361-fmcomms5-ext-lo-adf5355 | ZC706 | ADV7511 | AD-FMCOMMS5-EBZ external LO | doc |
| zynq-zc706-adv7511-ad9364-fmcomms4 | ZC706 | ADV7511 | AD-FMCOMMS4-EBZ | doc |
| zynq-zc706-adv7511-ad9434-fmc-500ebz | ZC706 | ADV7511 | AD9434-FMC-500EBZ | doc |
| zynq-zc706-adv7511-ad9625-fmcadc2 | ZC706 | ADV7511 | AD-FMCADC2-EBZ | doc |
| zynq-zc706-adv7511-ad9625-fmcadc3 | ZC706 | ADV7511 | AD-FMCADC3-EBZ | |
| zynq-zc706-adv7511-ad9739a-fmc | ZC706 | ADV7511 | EVAL-AD9739A | doc |
| zynq-zc706-adv7511-adrv9008-1 | ZC706 | ADV7511 | EVAL-ADRV9008-9009 | doc |
| zynq-zc706-adv7511-adrv9008-2 | ZC706 | ADV7511 | EVAL-ADRV9008-9009 | doc |
| zynq-zc706-adv7511-adrv9009 | ZC706 | ADV7511 | EVAL-ADRV9008-9009 | doc |
| zynq-zc706-adv7511-adrv9371 | ZC706 | ADV7511 | ADRV9371 | doc |
| zynq-zc706-adv7511-adrv9375 | ZC706 | ADV7511 | ADRV9375 | doc |
| zynq-zc706-adv7511-fmcdaq2 | ZC706 | ADV7511 | AD-FMCDAQ2-EBZ | doc |
| zynq-zc706-adv7511-fmcdaq3-revC | ZC706 | ADV7511 | eval-fmcdaq3-ebz | doc |
| zynq-zc706-adv7511-fmcjesdadc1 | ZC706 | ADV7511 | AD-FMCJESDADC1-EBZ | |
| zynq-zc706-adv7511-fmclidar1 | ZC706 | ADV7511 | AD-FMCLIDAR1-EBZ | doc |
| zynq-zc706-adv7511-fmcomms11 | ZC706 | ADV7511 | AD-FMCOMMS11-EBZ | doc |
| zynq-zed-adv7511 | Zed Board | ADV7511 | ||
| zynq-zed-adv7511-ad9361-fmcomms2-3 | Zed Board | ADV7511 | AD-FMCOMMS2-EBZ or AD-FMCOMMS3-EBZ | doc or doc |
| zynq-zed-adv7511-ad9364-fmcomms4 | Zed Board | ADV7511 | AD-FMCOMMS4-EBZ | doc |
| zynq-zed-adv7511-ad9467-fmc-250ebz | Zed Board | ADV7511 | AD9467-FMC-250EBZ | |
| zynq-zed-adv7511-cn0363 | Zed Board | ADV7511 | EVAL-CN0363-PMDZ | |
| zynq-zed-imageon | Zed Board | ADV7511 | FMC-IMAGEON |
We have heard of some versions of Windows, and some specific SD readers/writers that don't like the FAT parition that we make on the SD Cards - sorry - we have no idea, and have no way to replicate things (that we have found). If it doesn't work for you - try a different windows machine.
Boot
- plug the HDMI monitor in, the USB keyboard/mouse, and host console UART (these are done on the FPGA platform, not on the ADI card).
- make sure all the jumpers are set properly (depends on the board, need to set up to boot from SD card).
- plug in the FMC board to the FMC connector (or Pmod into the Pmod connector)
- connect to the console UART
- turn on the board
For Intel SoC the preloader and bootloader (1M) partition must be updated, see more info on Altera SOC Quick Start Guide
First you have to use the default environment from the SD card (otherwise the system may not boot):
- U-Boot
env default -a
saveenv
Then you need to update the MAC address of the board. For some reason, Xilinx doesn't do this on their boards, and you will not get the proper MAC address. Depending on where to do it:
- U-Boot
setenv ethaddr XX:XX:XX:XX:XX:XX (whatever is on the sticker on the board
save
reset
- Linux kernel
ifconfig eth2 down
ifconfig eth2 hw ether XX:XX:XX:XX:XX:XX (what ever is on the sticker on the board)
ifconfig eth2 up
The U-Boot and Linux kernel variables can be set through uEnv.txt (this file is located on the BOOT partition of the card). This file is required for correct operation. When creating the uEnv.txt file make sure that the end-of-line encoding is configured for newline (LF) and not carriage return + newline (CRLF), since uboot is not able to handle the carriage return character.
uenvcmd=run adi_sdboot
adi_sdboot=echo Copying Linux from SD to RAM... && fatload mmc 0 0x3000000 ${kernel_image} && fatload mmc 0 0x2A00000 ${devicetree_image} && if fatload mmc 0 0x2000000 ${ramdisk_image}; then bootm 0x3000000 0x2000000 0x2A00000; else bootm 0x3000000 - 0x2A00000; fi
bootargs=console=ttyPS0,115200 root=/dev/mmcblk0p2 rw earlyprintk rootfstype=ext4 rootwait

These boot messages may change based on your specific platform.
rgetz@brain:~/newest$ kermit -l /dev/ttyACM0 -b 115200  -c
Connecting to /dev/ttyACM0, speed 115200
 Escape character: Ctrl-\ (ASCII 28, FS): enabled
Type the escape character followed by C to get back,
or followed by ? to see other options.
----------------------------------------------------

U-Boot 2014.07-dirty (Nov 20 2014 - 17:07:55)

Board:  Xilinx Zynq
I2C:   ready
DRAM:  ECC disabled 1 GiB
MMC:   zynq_sdhci: 0
SF: Detected N25Q128A with page size 256 Bytes, erase size 64 KiB, total 16 MiB
In:    serial
Out:   serial
Err:   serial
Net:   Gem.e000b000
Hit any key to stop autoboot:  0
Copying Linux from SD to RAM...
Device: zynq_sdhci
Manufacturer ID: 3
OEM: 5344
Name: SU08G
Tran Speed: 50000000
Rd Block Len: 512
SD version 3.0
High Capacity: Yes
Capacity: 7.4 GiB
Bus Width: 4-bit
reading uImage
3194640 bytes read in 283 ms (10.8 MiB/s)
reading devicetree.dtb
18214 bytes read in 17 ms (1 MiB/s)
reading uramdisk.image.gz
 Unable to read file uramdisk.image.gz
## Booting kernel from Legacy Image at 03000000 ...
   Image Name:   Linux-3.17.0-gdf1ca8f
   Image Type:   ARM Linux Kernel Image (uncompressed)
   Data Size:    3194576 Bytes = 3 MiB
   Load Address: 00008000
   Entry Point:  00008000
   Verifying Checksum ... OK
## Flattened Device Tree blob at 02a00000
   Booting using the fdt blob at 0x2a00000
   Loading Kernel Image ... OK
   Loading Device Tree to 1fff8000, end 1ffff725 ... OK

Starting kernel ...

Uncompressing Linux... done, booting the kernel.
Booting Linux on physical CPU 0x0
Linux version 3.17.0-gdf1ca8f (buildserver-cj1@buildserver-cj1) (gcc version 4.8.1 (Sourcery CodeBench Lite 2013.11-33) ) #1 SMP PREEMPT Fri Dec 12 11:39:41 EET 2014
CPU: ARMv7 Processor [413fc090] revision 0 (ARMv7), cr=18c5387d
CPU: PIPT / VIPT nonaliasing data cache, VIPT aliasing instruction cache
Machine model: Xilinx Zynq ZC702
bootconsole [earlycon0] enabled
cma: Reserved 128 MiB at 27800000
Memory policy: Data cache writealloc
PERCPU: Embedded 7 pages/cpu @e6f95000 s8064 r8192 d12416 u32768
Built 1 zonelists in Zone order, mobility grouping on.  Total pages: 260624
Kernel command line: console=ttyPS0,115200 root=/dev/mmcblk0p2 rw earlyprintk rootfstype=ext4 rootwait
PID hash table entries: 4096 (order: 2, 16384 bytes)
Dentry cache hash table entries: 131072 (order: 7, 524288 bytes)
Inode-cache hash table entries: 65536 (order: 6, 262144 bytes)
Memory: 901608K/1048576K available (4241K kernel code, 241K rwdata, 1636K rodata, 199K init, 134K bss, 146968K reserved, 270336K highmem)
Virtual kernel memory layout:
    vector  : 0xffff0000 - 0xffff1000   (   4 kB)
    fixmap  : 0xffc00000 - 0xffe00000   (2048 kB)
    vmalloc : 0xf0000000 - 0xff000000   ( 240 MB)
    lowmem  : 0xc0000000 - 0xef800000   ( 760 MB)
    pkmap   : 0xbfe00000 - 0xc0000000   (   2 MB)
    modules : 0xbf000000 - 0xbfe00000   (  14 MB)
      .text : 0xc0008000 - 0xc05c5824   (5879 kB)
      .init : 0xc05c6000 - 0xc05f7f80   ( 200 kB)
      .data : 0xc05f8000 - 0xc06344a0   ( 242 kB)
       .bss : 0xc06344a0 - 0xc0655f20   ( 135 kB)
Preemptible hierarchical RCU implementation.
        Dump stacks of tasks blocking RCU-preempt GP.
        RCU restricting CPUs from NR_CPUS=4 to nr_cpu_ids=2.
RCU: Adjusting geometry for rcu_fanout_leaf=16, nr_cpu_ids=2
NR_IRQS:16 nr_irqs:16 16
L2C: platform provided aux values match the hardware, so have no effect.  Please remove them.
L2C-310 erratum 769419 enabled
L2C-310 enabling early BRESP for Cortex-A9
L2C-310 full line of zeros enabled for Cortex-A9
L2C-310 ID prefetch enabled, offset 1 lines
L2C-310 dynamic clock gating enabled, standby mode enabled
L2C-310 cache controller enabled, 8 ways, 512 kB
L2C-310: CACHE_ID 0x410000c8, AUX_CTRL 0x76360001
slcr mapped to f0006000
zynq_clock_init: clkc starts at f0006100
Zynq clock init
sched_clock: 16 bits at 54kHz, resolution 18432ns, wraps every 1207951633ns
timer #0 at f0008000, irq=43
Console: colour dummy device 80x30
Calibrating delay loop... 1332.01 BogoMIPS (lpj=6660096)
pid_max: default: 32768 minimum: 301
Mount-cache hash table entries: 2048 (order: 1, 8192 bytes)
Mountpoint-cache hash table entries: 2048 (order: 1, 8192 bytes)
CPU: Testing write buffer coherency: ok
CPU0: thread -1, cpu 0, socket 0, mpidr 80000000
Setting up static identity map for 0x402468 - 0x4024c0
CPU1: Booted secondary processor
CPU1: thread -1, cpu 1, socket 0, mpidr 80000001
Brought up 2 CPUs
SMP: Total of 2 processors activated.
CPU: All CPU(s) started in SVC mode.
devtmpfs: initialized
VFP support v0.3: implementor 41 architecture 3 part 30 variant 9 rev 4
regulator-dummy: no parameters
NET: Registered protocol family 16
DMA: preallocated 256 KiB pool for atomic coherent allocations
cpuidle: using governor ladder
cpuidle: using governor menu
bootconsole [earlycon0] disabled
bootconsole [earlycon0] disabled
xdevcfg f8007000.devcfg: ioremap 0xf8007000 to f001c000
[drm] Initialized drm 1.1.0 20060810
drivers/gpu/drm/adi_axi_hdmi/axi_hdmi_drv.c:axi_hdmi_platform_probe[175]
platform 70e00000.axi_hdmi: Driver axi-hdmi requests probe deferral
brd: module loaded
loop: module loaded
libphy: XEMACPS mii bus: probed
xemacps e000b000.eth: pdev->id -1, baseaddr 0xe000b000, irq 54
ehci_hcd: USB 2.0 'Enhanced' Host Controller (EHCI) Driver
ULPI transceiver vendor/product ID 0x0424/0x0007
Found SMSC USB3320 ULPI transceiver.
ULPI integrity check: passed.
zynq-ehci zynq-ehci.0: Xilinx Zynq USB EHCI Host Controller
zynq-ehci zynq-ehci.0: new USB bus registered, assigned bus number 1
zynq-ehci zynq-ehci.0: irq 53, io mem 0x00000000
zynq-ehci zynq-ehci.0: USB 2.0 started, EHCI 1.00
hub 1-0:1.0: USB hub found
hub 1-0:1.0: 1 port detected
usbcore: registered new interface driver usb-storage
usbcore: registered new interface driver usbserial
usbcore: registered new interface driver usbserial_generic
usbserial: USB Serial support registered for generic
usbcore: registered new interface driver ftdi_sio
usbserial: USB Serial support registered for FTDI USB Serial Device
mousedev: PS/2 mouse device common for all mice
i2c /dev entries driver
i2c i2c-0: Added multiplexed i2c bus 1
i2c i2c-0: Added multiplexed i2c bus 2
i2c i2c-0: Added multiplexed i2c bus 3
i2c i2c-0: Added multiplexed i2c bus 4
rtc-pcf8563 5-0051: chip found, driver version 0.4.3
rtc (null): invalid alarm value: 2014-12-17 31:34:0
rtc-pcf8563 5-0051: rtc core: registered rtc-pcf8563 as rtc0
i2c i2c-0: Added multiplexed i2c bus 5
at24 6-0050: 256 byte 24c02 EEPROM, writable, 1 bytes/write
i2c i2c-0: Added multiplexed i2c bus 6
i2c i2c-0: Added multiplexed i2c bus 7
i2c i2c-0: Added multiplexed i2c bus 8
pca954x 0-0074: registered 8 multiplexed busses for I2C switch pca9548
zynq-edac f8006000.ps7-ddrc: ecc not enabled
Xilinx Zynq CpuIdle Driver started
sdhci: Secure Digital Host Controller Interface driver
sdhci: Copyright(c) Pierre Ossman
sdhci-pltfm: SDHCI platform and OF driver helper
sdhci-arasan e0100000.sdhci: No vmmc regulator found
sdhci-arasan e0100000.sdhci: No vqmmc regulator found
mmc0: Invalid maximum block size, assuming 512 bytes
mmc0: SDHCI controller on e0100000.sdhci [e0100000.sdhci] using ADMA
ledtrig-cpu: registered to indicate activity on CPUs
hidraw: raw HID events driver (C) Jiri Kosina
usbcore: registered new interface driver usbhid
usbhid: USB HID core driver
platform 79020000.cf-ad9361-lpc: Driver cf_axi_adc requests probe deferral
ad9361 spi32766.0: ad9361_probe : enter
mmc0: new high speed SDHC card at address e624
mmcblk0: mmc0:e624 SU08G 7.40 GiB
 mmcblk0: p1 p2 p3
usb 1-1: new full-speed USB device number 2 using zynq-ehci
ad9361 spi32766.0: ad9361_probe : AD9361 Rev 2 successfully initialized
spi32765.0 supply vcc not found, using dummy regulator
spi32765.1 supply vcc not found, using dummy regulator
input: Microsoft Microsoft® 2.4GHz Transceiver v8.0 as /devices/soc0/amba@0/e0002000.usb/zynq-ehci.0/usb1/1-1/1-1:1.0/0003:045E:0745.0001/input/input0
cf_axi_dds 79024000.cf-ad9361-dds-core-lpc: Analog Devices CF_AXI_DDS_DDS MASTER (8.00.b) at 0x79024000 mapped to 0xf0052000, probed DDS AD9361
adv7511-hdmi-snd fpga-axi@0:adv7511_hdmi_snd: adv7511 <-> 75c00000.axi-spdif-tx mapping ok
TCP: cubic registered
NET: Registered protocol family 17
Registering SWP/SWPB emulation handler
hid-generic 0003:045E:0745.0001: input,hidraw0: USB HID v1.11 Keyboard [Microsoft Microsoft® 2.4GHz Transceiver v8.0] on usb-zynq-ehci.0-1/input0
input: Microsoft Microsoft® 2.4GHz Transceiver v8.0 as /devices/soc0/amba@0/e0002000.usb/zynq-ehci.0/usb1/1-1/1-1:1.1/0003:045E:0745.0002/input/input1
hid-generic 0003:045E:0745.0002: input,hidraw1: USB HID v1.11 Mouse [Microsoft Microsoft® 2.4GHz Transceiver v8.0] on usb-zynq-ehci.0-1/input1
input: Microsoft Microsoft® 2.4GHz Transceiver v8.0 as /devices/soc0/amba@0/e0002000.usb/zynq-ehci.0/usb1/1-1/1-1:1.2/0003:045E:0745.0003/input/input2
Console: switching to colour frame buffer device 240x67
input: failed to attach handler kbd to device input2, error: -16
hid-generic 0003:045E:0745.0003: input,hiddev0,hidraw2: USB HID v1.11 Device [Microsoft Microsoft® 2.4GHz Transceiver v8.0] on usb-zynq-ehci.0-1/input2
axi-hdmi 70e00000.axi_hdmi: fb0:  frame buffer device
axi-hdmi 70e00000.axi_hdmi: registered panic notifier
[drm] Initialized axi_hdmi_drm 1.0.0 20120930 on minor 0
cf_axi_adc 79020000.cf-ad9361-lpc: ADI AIM (8.00.b) at 0x79020000 mapped to 0xf0078000, probed ADC AD9361 as MASTER
rtc-pcf8563 5-0051: setting system clock to 2014-12-15 11:39:39 UTC (1418643579)
ALSA device list:
  #0: HDMI monitor
random: nonblocking pool is initialized
EXT4-fs (mmcblk0p2): recovery complete
EXT4-fs (mmcblk0p2): mounted filesystem with ordered data mode. Opts: (null)
VFS: Mounted root (ext4 filesystem) on device 179:2.
devtmpfs: mounted
Freeing unused kernel memory: 196K (c05c6000 - c05f7000)
Mount failed for selinuxfs on /sys/fs/selinux:  No such file or directory
 * Setting up X socket directories...                                    [ OK ]
 * Starting IIO Daemon iiod                                              [ OK ]

Last login: Mon Dec 15 11:26:54 UTC 2014 on tty1
Welcome to Linaro 14.04 (GNU/Linux 3.17.0-gdf1ca8f armv7l)
 * Documentation:  wiki.analog.org   ez.analog.com

root@analog:~#
- Ignore your PC, and now interact on the USB mouse/keyboard on the Zynq device
- You should see one application starting:
- IIO Scope tool:

- Learn more about the IIO Scope.
- You are now done with creating the SD card. You can interact with the GUI either over the network, or with the HDMI monitor/USB keyboard mouse.
- However, it's likely that you have an old image. We update kernels and the tools faster/more often than we make complete SD images, so it's important that you follow the instructions for updating your system below.

Even thought this is Linux, this is a persistent file systems. You have to take care not to corrupt the file system -- please shut down things, don't just turn off the power switch. Depending on your monitor, the standard power off could be hiding. You can do this from the terminal as well with:
sudo shutdown -h now
or
sudo reboot

Users and Passwords
The default user for the graphical desktop environment is the “analog” user, the password for this user is “analog”. The password for the “root” account is “analog” as well.
| User | Password |
|---|---|
| root | analog |
| analog | analog |
Staying up to date
There are 2 things to update:
- Userspace Tools (GUI/tools, in the Linux rootfs).
- ZYNQ Processing System / FPGA Boot Files & Linux kernel (the FAT32 BOOT partition).
Upgrading one side, without upgrading the other might cause more problems than it solves. If you are upgrading, please upgrade both.
Staying up to date is a combination of:
- Package management via apt-get
- checking out source code with git tools
- downloading files via wget
If you need to use a proxy for any of these:
User Space Tools
There are a number of ADI provided tools in the file system. There is an easy way to rebuild these projects from source. The only requirement is an healthy image and active Internet connection.
In order to update all ADI tools - simply call the update script as shown below: In case you only want to update a certain project, the script accepts a single parameter, the ADI github project name. (https://github.com/analogdevicesinc)
If you are using an old image & old update tools script - you may need to run the update tools script twice (the first time it updates the update script, and the second time it updates everything else). This has been resolved in the most recent update script (the script updates itself, and switches over to the new one), so you only need to do this if you are using an older version.
This specifies any shell prompt running on the target
root@linaro-ubuntu-desktop:~# sudo adi_update_tools.sh

* Cloning fmcomms1-eeprom-cal *
Cloning into 'fmcomms1-eeprom-cal'...
remote: Counting objects: 19, done.
remote: Compressing objects: 100% (15/15), done.
remote: Total 19 (delta 6), reused 12 (delta 3)
Unpacking objects: 100% (19/19), done.

* Building fmcomms1-eeprom-cal *
cc -Wall -Wextra -pedantic -std=gnu99   -c -o main.o main.c
cc -Wall -Wextra -pedantic -std=gnu99  -o xcomm_cal main.o  -lm
install -d /usr/local/bin
install ./xcomm_cal /usr/local/bin/

Building fmcomms1-eeprom-cal finished Successfully


* Cloning iio-cmdsrv *
Cloning into 'iio-cmdsrv'...
remote: Counting objects: 199, done.
remote: Compressing objects: 100% (124/124), done.
remote: Total 199 (delta 73), reused 199 (delta 73)
Receiving objects: 100% (199/199), 44.46 KiB | 80 KiB/s, done.
Resolving deltas: 100% (73/73), done.

* Building iio-cmdsrv *
cc -Wall -Wextra -pedantic -std=gnu99 -s   -c -o iio_cmdsrv.o iio_cmdsrv.c
cc -Wall -Wextra -pedantic -std=gnu99 -s  -o iio_cmdsrv iio_cmdsrv.o  -lm
install -d /usr/local/bin
install ./iio_cmdsrv /usr/local/bin/
install ./scripts/* /usr/local/bin/

Building iio-cmdsrv finished Successfully


* Cloning iio-oscilloscope *
Cloning into 'iio-oscilloscope'...

[-snip-]
ZYNQ Processing System / FPGA Boot Files
The default ADI ZYNQ image supports a variety of ZYNQ boards and reference designs. In order to keep those boot files up to date. There is a another script that downloads the latest builds from the ADI Wiki page and installs them onto the FAT32 partition on the SD Card. The only requirement is a healthy image and active Internet connection.
In order to update all ADI tools, simply call the adi_update_boot.sh script as shown below:
This specifies any shell prompt running on the target
root@linaro-ubuntu-desktop:~# sudo adi_update_boot.sh
--2013-12-11 14:22:46--  http://wiki.analog.com/_media/resources/tools-software/linux-drivers/platforms/latest_zynq_boot.txt
Resolving wiki.analog.com (wiki.analog.com)... 195.170.124.184
Connecting to wiki.analog.com (wiki.analog.com)|195.170.124.184|:80... connected.
HTTP request sent, awaiting response... 200 OK
Length: 153 [text/plain]
Saving to: `latest_zynq_boot.txt'

100%[======================================>] 153         --.-K/s   in 0s

2013-12-11 14:24:13 (3.96 MB/s) - `latest_zynq_boot.txt' saved [153/153]

sed: can't read /media/boot/VERSION: No such file or directory
CURRENT VERSION:
NEW VERSION    : build-2013-12-10
--2013-12-11 14:24:13--  http://wiki.analog.com/_media/resources/tools-software/linux-drivers/platforms/zynq_boot_build-2013-12-10.tgz
Connecting to wiki.analog.com (wiki.analog.com)|195.170.124.184|:80... connected.
HTTP request sent, awaiting response... 200 OK
Length: 28330816 (27M) [application/x-gzip]
Saving to: `zynq_boot_build-2013-12-10.tgz'

100%[======================================>] 28,330,816  9.64M/s   in 2.8s

2013-12-11 14:24:16 (9.64 MB/s) - `zynq_boot_build-2013-12-10.tgz' saved [28330816/28330816]

CURRENT BOARD CONFIG: /media/boot/zynq-zed-adv7511-xcomm
Extracting - Be patient!
..............DONE
root@linaro-ubuntu-desktop:~#
It may happen that you have to copy manually the boot files to complete the update.
To do so, plug the SD card into your computer, and:
- Copy ${CONFIG}/devicetree.dtb to devicetree.dtb on the root of the SD card,
- Copy ${CONFIG}/BOOT.BIN to BOOT.BIN on the root of the SD card,
- Copy common/uImage to uImage on the root of the SD card.
(Replace ${CONFIG} with the config name that applies in your case, e.g. “zynq-zed-adv7511-ad9361” for a FMCOMMS2/3 on a ZedBoard.)
Customizing the device tree on the target
The device tree is a data structure for describing hardware. Rather than hard coding every detail of a device into an operating system, many aspect of the hardware can be described in a data structure that is passed to the operating system at boot time.
For your convenience – all device tree files (dtb) for our designs are included in the SD Card boot partition. Sometimes it's desired to change certain device tree properties permanently.
For example a custom board has a different reference clock.
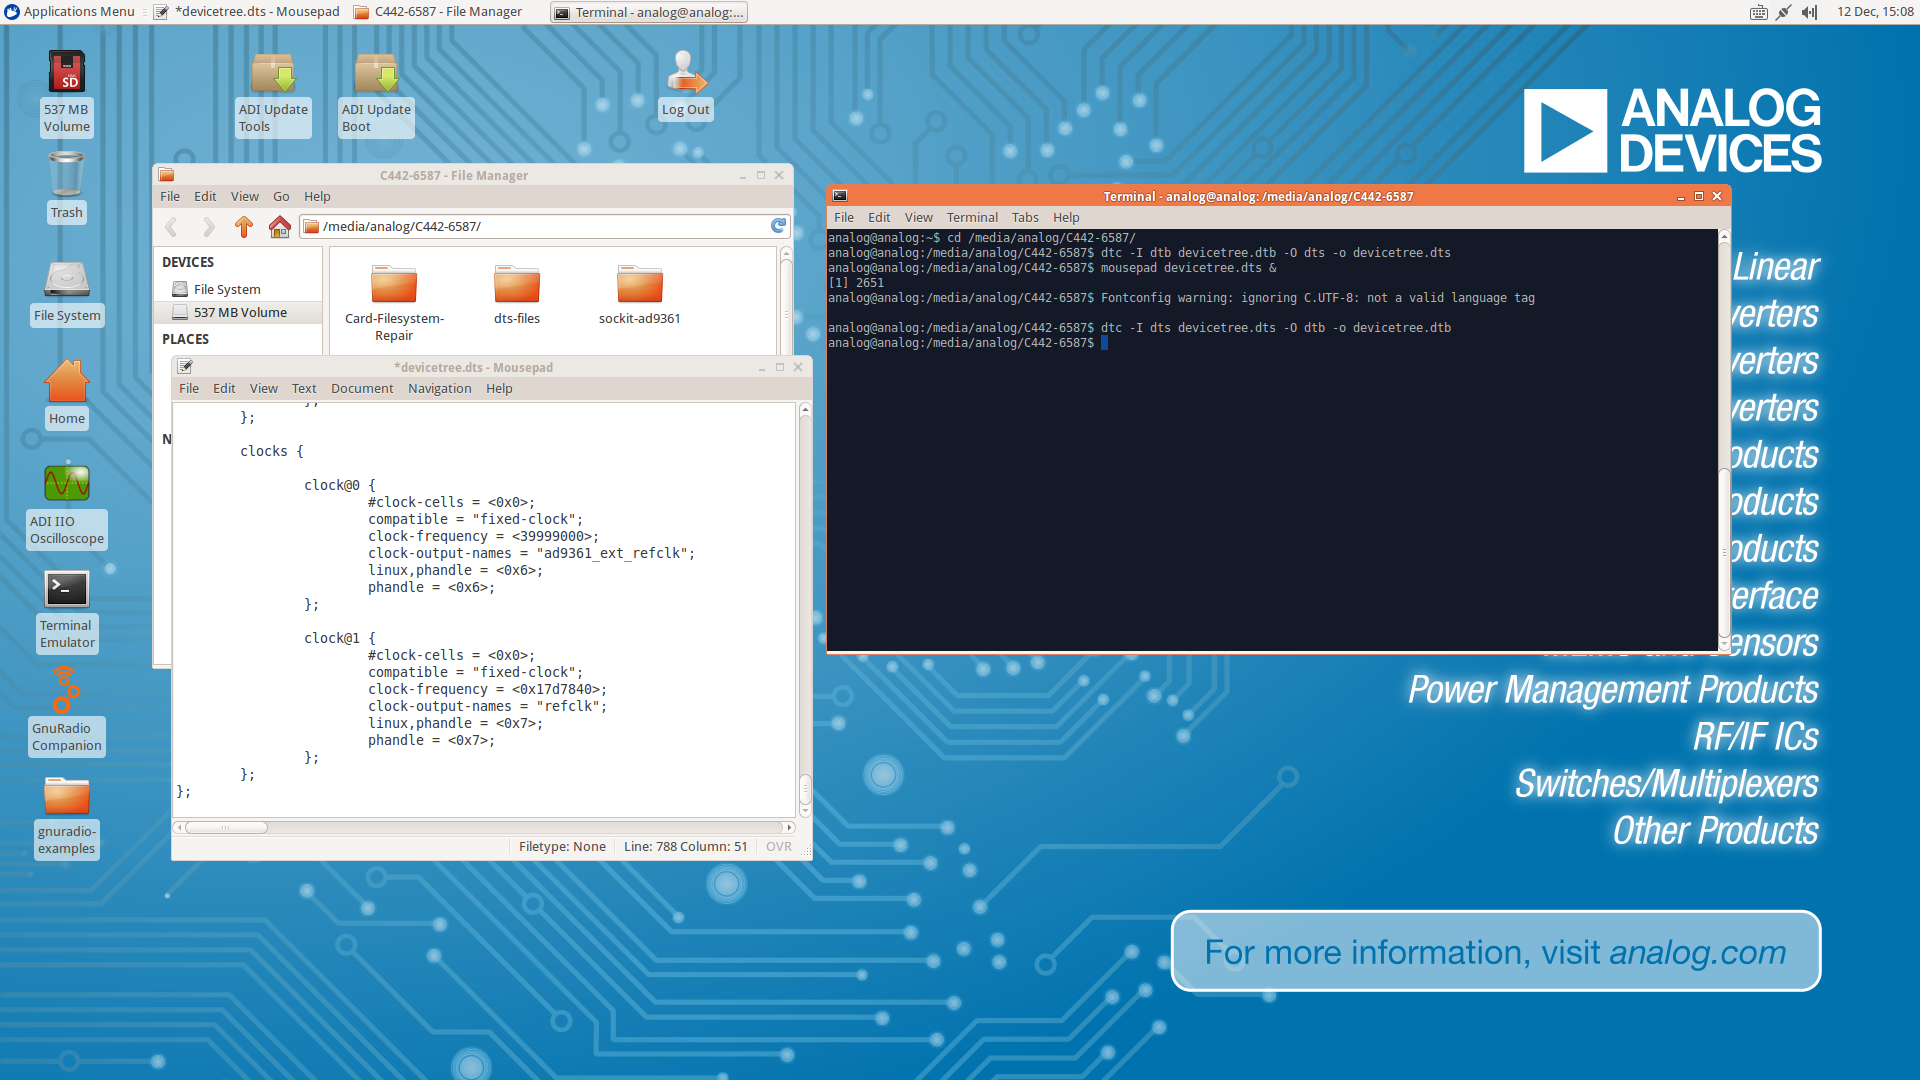
- Mount the FAT32 Boot partition by clicking on the 537MB Volume Icon on the desktop
- Open a shell by clicking ion the Terminal Icon on the desktop (or CTRL+ALT+t)
- Now convert the devictree.dtb into a dts file
- Edit the file (mousepad or vi)
- Convert the devictree.dts back into its binary format.
- Unmount the file system (right click)
This specifies any shell prompt running on the target
analog@analog:~$ cd /media/analog/BOOT/
analog@analog:/media/analog/BOOT$ dtc -I dtb devicetree.dtb -O dts -o devicetree.dts
analog@analog:/media/analog/BOOT$ mousepad devicetree.dts &
analog@analog:/media/analog/BOOT$ dtc -I dts devicetree.dts -O dtb -o devicetree.dtb
analog@analog:/media/analog/BOOT$
Accessing Files
On the embedded Linux target there is Samba_(software) service running. Allowing you to access (Add/map Network Location/Drive) everything under /media on the target.
From Windows host
The only thing you need to do is:
- Plug in a network cable (network with DHCP)
- Open a serial remote console or on the target itself type
ifconfig - Now you know your IP address (inet addr:XXX.XXX.XXX.XXX)
- On Windows Internet Explorer type following URL \\XXX.XXX.XXX.XXX or use the Map Network Drive functionality the path is: \\XXX.XXX.XXX.XXX\ADI Linux Image
By default, only read access is possible. If you want to be able to copy files onto the image over the network share, the permissions need to be changed first. This can be done by running the following command on the board:
Modify network share permissions
sudo chmod 777 /media/*
Be aware that with this change anybody on your network will now be able to write to the image.
From Linux host
Use rsync, or ssh, or scp, or just plug in the SD card to your Linux machine, and mount the ext4 file system. If you really need help - ask.
License
The Linaro based GNU/Linux image found/distributed here is a modular operating system consisting of hundreds of software components. Most (but not all) of the components are open source packages, developed independently, and accompanied by separate license terms (such as GPLv2, GPLv3, LGPL, BSD, modified BSD or others). Your license rights with respect to individual components accompanied by separate license terms are defined by those terms (The license agreement for each component is generally located in the component's source code); nothing (including obtaining these components as part of an aggregate) shall restrict, limit, or otherwise affect any rights or obligations you may have, or conditions to which you may be subject, under such license terms.
The license terms of components found in the Linaro image normally (but not always) permit you to copy, modify, and redistribute the component, and may include obligations - including distributing the changes to the source.
If you include this software components from this image in your product, it is up to you and your legal team to make sure your product complies with the licensing requirements of whatever software package that you include.
You may make and use unlimited copies of the Software for your distribution and use within your organization. You may make and distribute unlimited copies of the Software outside your organization.
resources/tools-software/linux-software/embedded_arm_images.1629128510.txt.gz · Last modified: 16 Aug 2021 17:41 by Stefan-Robert Raus