


This version (10 Oct 2023 09:43) was approved by John Joseph.The Previously approved version (04 Jul 2020 20:41) is available.
Load Application using CCES
ADSP-SC573 / ADSP-SC584 / ADSP-SC589 / ADSP-SC594 Target
- Establish the hardware setup as described in ADSP-215xx/ADSP-SC5xx Hardware Setup.
- Launch CrossCore Embedded Studio.
- Uncheck “Build (if required) before launching” checkbox in Window→Preferences→Run/Debug→Launching.
- Select Run→Debug Configurations. The procedure debug session creation is different for SC598 compared to other SC5xx target platforms. Create a new Debug configuration under ‘Application with CrossCore Debugger’. Select appropriate processor, connection type and platform. Click finish.
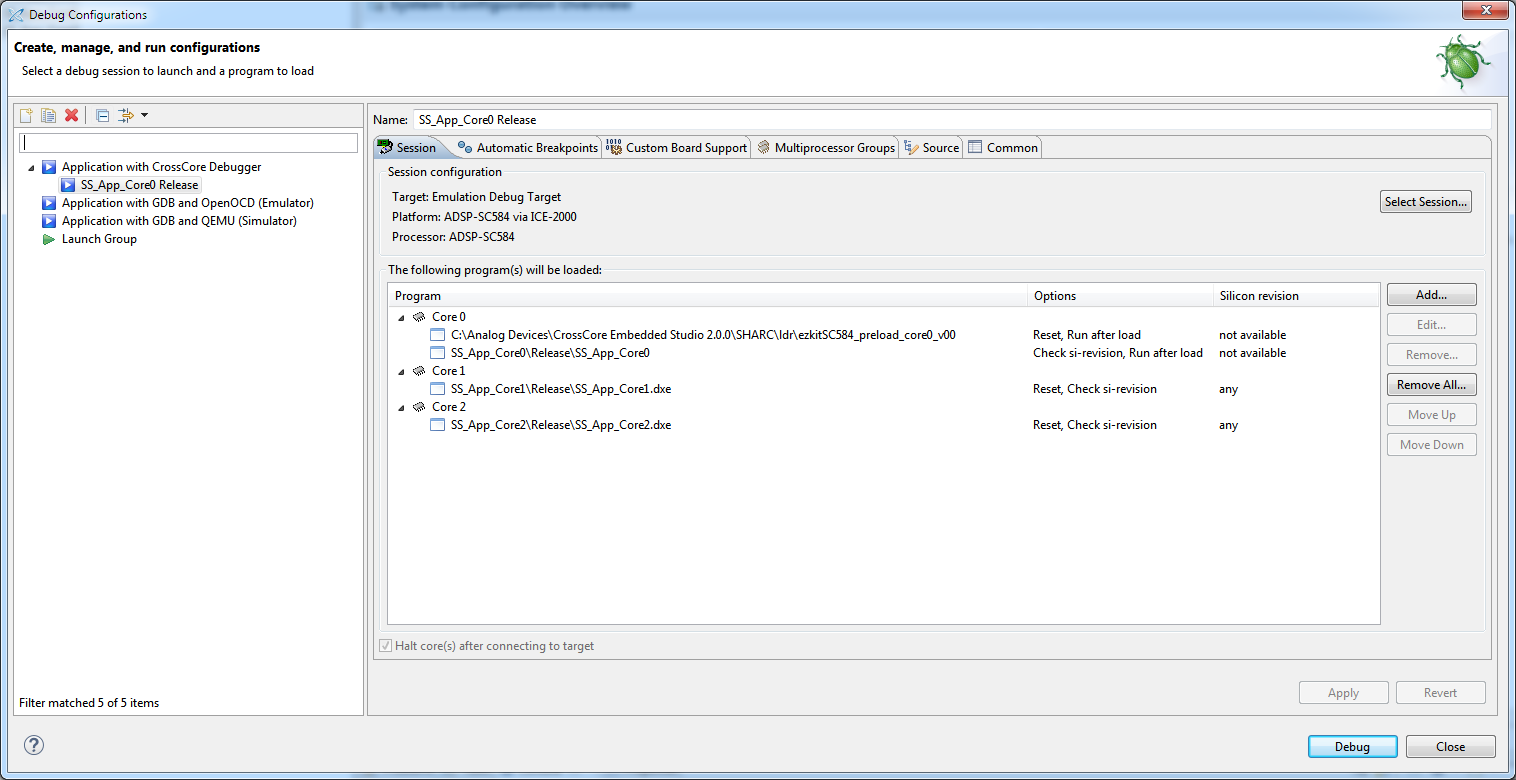
- Load the prebuilt DXE’s for appropriate target ‘SS_App_Core0’ on Core 0, ‘SS_App_Core1.dxe’ on Core 1 and ‘SS_App_Core2.dxe’ on Core 2 as shown below figure. Prebuilt DXEs of each project can be found inside the respective ‘Release’ folders of each of the projects (under 'SigmaStudioPlus-Relx.y.z\Target\Examples\Demo' folder).

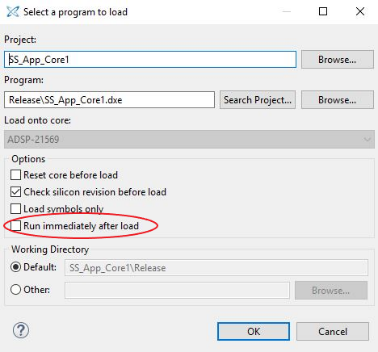
- Double click on ‘SS_App_Core1.dxe’ of Core 1 and uncheck ‘Run immediately after load’ option as shown in the below figure. Repeat the same for ‘SS_App_Core2.dxe’ for Core 2.

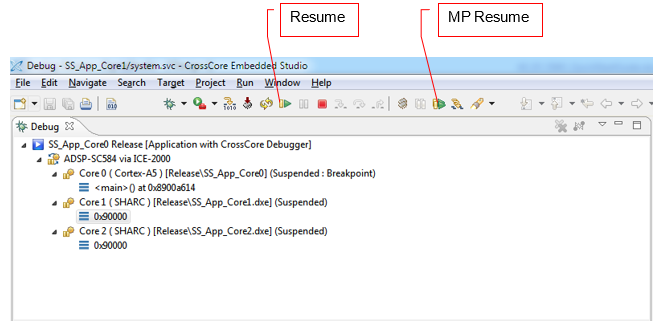
- Reset the board and press ‘Debug’ to launch the debug session. Click on “MP Resume” to run Core 0 (ARM). This enables the Core 1 and 2 (SHARC). Then individually select and run Core 1 and Core 2 by clicking on “Resume” as shown in below figure.


ADSP-21573 / ADSP-21584 / ADSP-21593 Target
- Establish the hardware setup as described in ADSP-215xx/ADSP-SC5xx Hardware Setup.
- Launch CrossCore Embedded Studio.
- Uncheck “Build (if required) before launching” checkbox in Window→Preferences→Run/Debug→Launching.
- Select Run→Debug Configurations. Create a new Debug configuration under ‘Application with CrossCore Debugger’. Select appropriate processor, connection type and platform. Click finish.
- Load the prebuilt DXE’s for appropriate target ‘Preload_21584_Core0_Core1.dxe” or “215xx_preload_Core1.dxe” for 21584 and 21573 respectively, and “SS_App_Core1.dxe” on Core 1 and ‘SS_App_Core2.dxe’ on Core 2 as shown in below figure. Prebuilt DXEs of each project can be found inside the respective ‘Release’ folders of each of the projects (under 'SigmaStudioPlus-Relx.y.z\Target\Examples\Demo' folder).

- Double click on ‘SS_App_Core2.dxe’ of Core 2 and uncheck ‘Run immediately after load’ option as shown in below figure.

- Reset the board and press ‘Debug’ to launch the debug session. Click on “Resume” to run Core 1(SHARC). This enables the Core 2 (SHARC). Then individually select and run Core Core 2 by clicking on “Resume” as shown in below figure.


ADSP-21569 Target
- Establish the hardware setup as described in ADSP-215xx/ADSP-SC5xx Hardware Setup.
- Launch CrossCore Embedded Studio.
- Uncheck “Build (if required) before launching” checkbox in Window→Preferences→Run/Debug→Launching.
- Select Run→Debug Configurations. Create a new Debug configuration under ‘Application with CrossCore Debugger’. Select appropriate processor, connection type and platform. Click finish.
- The prebuilt DXE’s for the target ‘ezkit21569_preload.dxe” is automatically loaded on Core1. Load the prebuilt “SS_App_Core1.dxe” on Core 1. Prebuilt DXEs of each project can be found inside the respective ‘Release’ folders of each of the projects (under 'SigmaStudioPlus-Relx.y.z\Target\Examples\Demo' folder).

- Double click on ‘SS_App_Core1.dxe’ of Core 1 and uncheck ‘Run immediately after load’ option as shown in below figure.

- Reset the board and press ‘Debug’ to launch the debug session. Click on “Resume” to run Core 1(SHARC) as shown in below figure.


ADSP-SC598 EV-SOM Target
- Establish the hardware setup as described in ADSP-215xx/ADSP-SC5xx Hardware Setup.
- Launch CrossCore Embedded Studio.
- Uncheck “Build (if required) before launching” checkbox in Window→Preferences→Run/Debug→Launching.
- Select Core0 CCES Project and go to Run→Debug Configurations. Create a new Debug configuration under ‘Application with GDB and OpenOCD(Emulaotr)’.

- Select appropriate emulator in “Target” Tab.

- Select appropriate build mode executable in the “Main” Tab and click on “Apply” and “Close”.

- Select Core1 CCES Project and go to Run→Debug Configurations. Create a new Debug configuration under ‘Application with CrossCore Debugger’, select appropriate processor and click on Next.

- Select connection type as “Emulator” click on “Next” and in next window select appropriate emulator click on “Finish”.

- Load the prebuilt DXE’s for appropriate target ‘SS_App_Core1.dxe’ on Core 1 and ‘SS_App_Core2.dxe’ on Core 2 as shown below figure. Prebuilt DXEs of each project can be found inside the respective ‘Release’ folders of each of the projects (under 'SigmaStudioPlus-Relx.y.z\Target\Examples\Demo' folder).

- Since ARM is main core the SC598 preload .dxe can be removed from Core1 by selecting the preload .dxe and using “Remove” option on the right-side.
- Double click on ‘SS_App_Core1.dxe’ of Core 1 and “Check” reset Core option, since preload .dxe file removed from Core1. Now click on “Apply” and “Close”.

- Select the Core0 CCES Project again and go to Run→Debug Configurations. Create a new Debug launch group under ‘Application with CrossCore Launch Group’.

- Add the ‘Application with GDB and OpenOCD(Emulaotr)’ and ‘Application with CrossCore Debugger’ debug configuration one after other one using “Add..” button on the right and clicking on “OK”.


- Reset the board, Apply and click on “Debug” button to start debug session. Select “OK” to open the debug window which will open a window on left side of Project explorer.

- Click on “Resume(F5)” to run Core 0 (ARM). This enables the Core 1 and 2 (SHARC).

- Then individually select and run Core 1 and Core 2 by clicking on “Resume(F5)” as shown in below figure.

- Link compile download the SigmaStudio+ schematic if Demo or Lib integration application is used.


Link compile download schematic not required if DemoUc application is used, since the schematic source code already included in the target application. Also target framework and application don't support redownload of schematic, once downloaded on to the running target application. The target application should be rerun by resetting the target platform to download the schematic again.
resources/tools-software/sigmastudiov2/gettingstarted/load_executable_using_cces.txt · Last modified: 15 Sep 2023 09:13 by Sakthivel Perumal