This is an old revision of the document!
Sharc Audio Module - Ethernet Audio Example
This section will take you through a few examples to set up and run ethernet audio, including using the shell terminal program to interface with the application.
Hardware Setup
Switch Setup
ADZS-SC589-MINI
| 1. Power on your SAM board and plug in the 12V Power Supply to the 12V connector. If the board is properly powered, the green LED9/PWR will light up. |  |
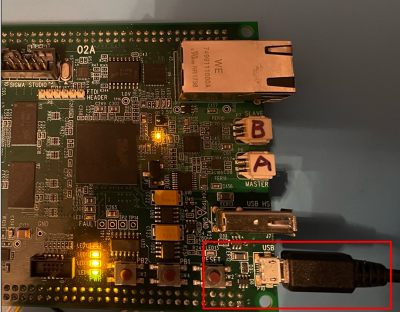
| 2. Plug the USB Micro Type B side to the SAM board USB connector and the USB Type A side to a USB connection on the PC. |  |
| 3. Connect the Portable speaker to the LINE OUT connector on the SAM (ensure the speaker is turned on!). |  |
| 4. Connect the other end of the second ethernet cable to the ethernet port on the SAM labelled J3 |  |
| 5. Proceed to the software setup instructions (common for all hardware variants) | NA |
ADZS-SC584-EZLITE
| 1. Power on your board and plug in the 12V Power Supply to the 12V connector. If the board is properly powered, the green PWR LED will light up. |  |
| 2. Plug the USB Micro Type B side to the board USB OTG connector and the USB Type A side to a USB connection on the PC. |  |
| 3. Connect the Portable speaker to the HEADPHONES connector on the board (ensure the speaker is turned on!). |  |
| 4. Connect the other end of the second ethernet cable to the ethernet port on the hardware labelled J4 |  |
| 5. Proceed to the software setup instructions (common for all hardware variants) | NA |
Software Setup
Follow the instructions below to set up the software.
Serial Terminal Setup
Audio Connection Setup
This setup will allow audio to pass from ethernet input to analog output through your hardware. This setup allows us to play audio via a virtual VBAN soundcard established by Voicemeter and output to a mini portable speaker.
1. Ensure that a valid ethernet connection can be established between the PC and the board by pinging it. Using the Windows command prompt run:
ping 192.168.90.103
A valid connection will respond with four replies. Note that the user's VPN and firewall can affect this connection so local traffic may need to be permitted by the firewall and/or VPN may need to be disabled to run this test. |  |
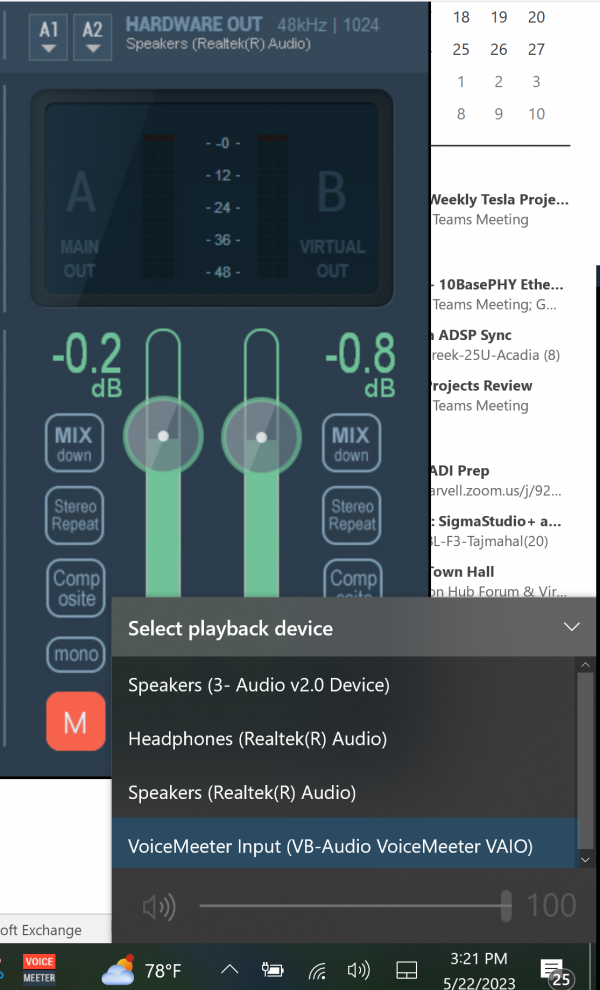
| 2. Open Voicemeeter and after the hardware out option has finished initializing, set the PCs playback device to Voicemeeter Input |  |
| 2. Press the VBAN button in the top right corner to configure VBAN ethernet audio. |  |
3. Under Outgoing Streams set the following parameters:
Source = Bus B
Stream Name = SAM
IP Address To = 192.168.90.103
SamplerRate = 48000Hz
Ch = 2
Format = PCM 16 Bits
Net Quality = Optimal
Press the On button to enable the source. |  |
4. In the shell terminal, type
vban rx on 192.168.90.103 6980 2 16
and
vban rx domain system
This will prime the board to receive VBAN audio on port 6980 at ethernet address 192.168.90.103 with 2 channels of audio at 16-bits per channel. Type vban again to verify the proper settings. |  |
| 5. In the shell terminal, type help route. The shell will display the usage for the route command. |  |
| 6. In the shell terminal, type route. The shell will display the current audio routing table. |  |
| 7. In the shell terminal, type route 0 vban 0 codec 0 2 20 to add to route table index 0 the audio routing of vban audio to codec output with 2 channels and an attenuation of 20dB. Type route again to ensure that table was updated properly. |  |
| 8. Finally, on your PC, enable audio through a preferred method, such as Youtube. You should now be able to hear the audio from your PC, through the VBAN virtual audio card, through the hardware and coming out of the speaker connected to LINE OUT or HEADPHONES. | NA |
There are no ASRCS currently implemented for a VBAN to DAC clocking domain at this time. As a result, the output may underrun eventually. This is a very basic example just to show ethernet audio. VBAN to VBAN audio should be used to keep clock domains aligned. ASRCS may be implemented in the future.
 This version (13 Sep 2023 19:21) was approved by Rebecca Butler.The Previously approved version (22 May 2023 21:51) is available.