


This version is outdated by a newer approved version. This version (01 Mar 2016 23:07) was approved by Tim Harder.The Previously approved version (01 Mar 2016 23:06) is available.
This version (01 Mar 2016 23:07) was approved by Tim Harder.The Previously approved version (01 Mar 2016 23:06) is available.This is an old revision of the document!
Table of Contents
AD-FREQCVT1-EBZ Production Testing
Overview
The production testing is quite simple, since each board has been completely characterized and we know the layout is good, we can just look for gross errors. First the noise floor is checked when no input is supplied to make sure it is within a certain threshold, then a couple tones are input and the response is checked to be within certain bounds.
Creating an SD test card
First, write the latest available SD card image found at https://wiki.analog.com/resources/tools-software/linux-software/zynq_images to a spare card and prepare the card to boot into Linux as detailed on that page for the target FMCOMMS and carrier boards. In this case copy the BOOT.BIN and devicetree.dtb files from the zynq-zc706-adv7511-ad9361-fmcomms2-3 folder into the base directory of the SD card's boot partition).
Then the card needs to be modified to run the tests automatically on boot. Test scripts are provided in https://github.com/analogdevicesinc/linux_image_ADI-scripts that automate initializing osc with the correct profile and environment.
See the following example diff for required changes to the launcher to run the tests on boot:
--- ./.config/autostart/config_autostart_osc.desktop	2013-12-09 15:55:41.774730469 -0500
+++ ./.config/autostart/config_autostart_osc.desktop	2012-12-31 19:20:18.000000000 -0500
@@ -1,11 +1,11 @@

 [Desktop Entry]
 Type=Application
-Exec=/usr/local/bin/osc
+Exec=sudo /usr/local/bin/test_freqcvt1.sh
 Hidden=false
 NoDisplay=false
 X-GNOME-Autostart-enabled=true
Required hardware
- 1 ZC706 carrier board
- 1 SD test card
- 1 AD-FMCOMMS3-EBZ board
- 1 AD-FREQCVT1-EBZ board
- 1 12-pin ribbon cable
- 1 3 pin power cable
- 1 SMA loopback cable
Test process
The FREQCVT1 testing should be done using the following steps:
- Make sure the ZC706 plugged in with the testing SD card inserted.
- The FREQCVT1 board should be mounted on the TX2A/RX2A jacks of the AD-FMCOMMS3-EBZ board and the power cable and signal cables connected as seen in the image below.
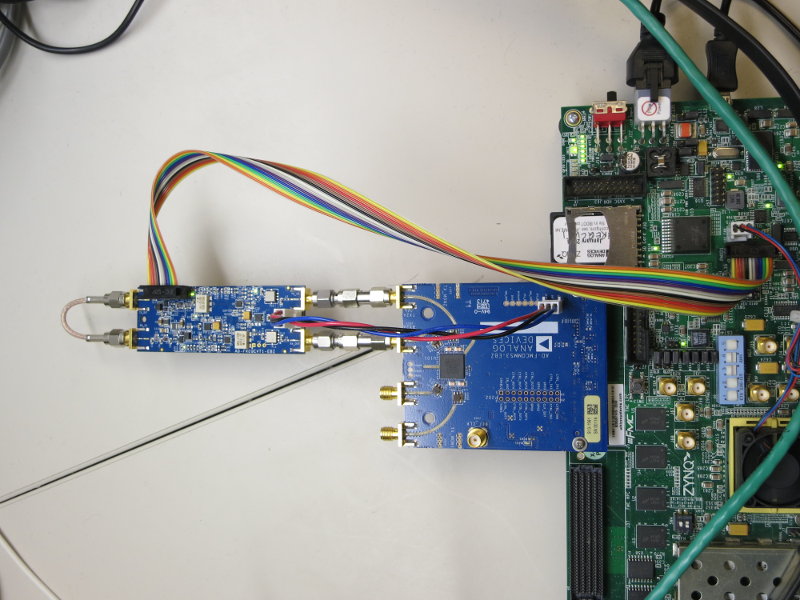
- Connect the RX_IN and TX_OUT jacks on the FREQCVT1 board with the SMA loopback cable.
- Power on the ZC706 board.
- The board should boot into the ADI Linux environment and begin the tests automatically.
- When tests pass, the following window should be shown as seen in the image below. If tests fail, a error dialog will be shown instead. In either case, hit the confirmation button to halt Linux and after several seconds power off the carrier board via the physical switch on the ZC706.

- Remove the FREQCVT1 card and return to step 1 to continue with the next board.


resources/eval/user-guides/ad-freqcvt1-ebz/testing.1456870024.txt.gz · Last modified: 01 Mar 2016 23:07 by Tim Harder