Click here to return to the USB Interfaces page
The Analog Devices USBi “USB Interface” (EVAL-ADUSB2) board is the interface between your PC's USB port and SigmaDSP hardware's data input pins. This interface can be used with any evaluation board which includes an External SPI/I²C header (Aardvark Header). The EVAL-ADUSB2 board is capable of both SPI and I²C communication (which is user selectable) and can supply IOVDD of either 3.3V or 1.8V.
The USBi interface is powered from the computer's USB port.
Note: The first time the USBi board drivers are instaledl on a PC, you will be prompted to repeat the above steps a second time, for the “Analog Devices USBi (unloaded)” device. This is normal and occurs because the USBi board's firmware is updated during the first driver installation operation.
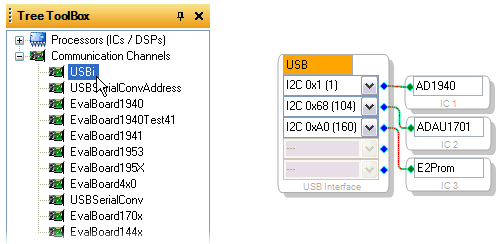
To communication between SigmaStudio and the USBi board, a communication channel block must be added to the Schematic design. To locate the block, select the Hardware Configuration Tab, int the ToolBox or Tree ToolBox window choose the “Communication Channels” category, and select the USBi block.

Note: Only one of this block's output pins must be connected. It is not necessary to connect or terminate all of the output pins. Also, you connect a processor to any of the pins, there is no specific requirement for pin connection order.
This block provides connections for multiple processors (ICs / DSPs), allowing you to use multiple processors in a single design. This block allows you to explicitly specify both the communication protocol (SPI or I²C) and the part's address, I²C address or SPI clatch line. The DSP hardware's address must match the block's selected address for communication to function properly. See the parts data sheet for more information about addressing (e.g. ADR_SEL, ADDR0, or ADDR1 pins). The default USBi protocol is I²C, to enable SPI, you must first select an SPI address in the block's drop down menu and then perform three write operations (e.g. press the write button the Register Read/Write Window 3 times). The USBi hardware has LEDs which indicate the current mode, I²C or SPI.
See the EVAL-ADUSB2 data sheet for more information, www.analog.com/sigmadsp.