


The most recent version of this page is a draft. This version is outdated by a newer approved version.This version (23 Jul 2019 20:32) was approved by malavika sajikumar.The Previously approved version (23 Jul 2019 10:55) is available.
This version is outdated by a newer approved version.This version (23 Jul 2019 20:32) was approved by malavika sajikumar.The Previously approved version (23 Jul 2019 10:55) is available.This is an old revision of the document!
Table of Contents
Mbed: User Guide for SDP-K1
Introduction
Generally known as SDP-K1, EVAL-SDP-CK1Z board, is one of Analog Devices' Mbed enabled boards. SDP-K1 holds an ST microcontroller, STM32F469NI, and has a programming/debugging processor from Freescale, MK20DX128. The CMSIS-DAP hardware circuit and DAPLink firmware in the Freescale processor, allows SDP-K1 board to be easily programmed and debugged. The board has an Arduino form factor and has a 120-pin connector which plugs into many evaluation boards from Analog Devices.
Mbed is used by Analog Devices to develop and distribute drivers for Analog ICs. Mbed is an online IDE developed by ARM. It is open-source and supports controller boards with Cortex ARM core processors. These controller boards are developed by various companies including Analog Devices, ST Microcontroller, NXP, Renesas etc. This is an easy platform to use because being an online IDE, there is no downloading or installation of software required. The IDE is a web page https://ide.mbed.com/compiler. The platform is available at no cost for customers and is easy to use. Another advantage to Mbed is that the example programs can be run on other Mbed enabled boards that customers are familiar with as long as it meets the hardware setup requirements.
More details regarding SDP-K1 board features, components and pin out diagrams can be found on the official Mbed web page for SDP-K1.
https://os.mbed.com/platforms/SDP_K1/
You can purchase SDP-K1 from the official analog.com web page for SDP-K1.
http://www.analog.com/SDP-K1
https://wcm.corpnt.analog.com/en/design-center/evaluation-hardware-and-software/evaluation-boards-kits/sdp-k1.html#eb-overview
Board Features
- Arduino Uno headers
- 120-pin SDP connector
- High performance ARM® Cortex™-M4 Core (STM32F469NI)
- 180 MHz max CPU frequency, 384 KB SRAM, 2048 KB Flash
- 1.8V or 3.3V selectable IO voltage
- 480Mbps High-Speed USB 2.0 (Device)
- 45MHz SPI
- 400KHz I2C
- UART
- Timers / PWM
- 12-bit ADC
- GPIO
- 16MB SDRAM
- 3 traffic light LEDS (green, orange, red)
- 1 status LED
Board Components


Board Pinout
Here is the pin out diagram for Arduino headers on SDP-K1 board.

Here is the pin out diagram for 120 pin connector on SDP-K1 board.

Quick Start Guide
Each product with Mbed support comes with:
- library files or drivers for the product and,
- a top level example program that provides a text based menu driven interface that demonstrates the library functions.
All the code files will be shared on the code tab of Analog Devices Mbed web page https://os.mbed.com/teams/AnalogDevices/code/. Each project comes with a README.txt that explains how to use the code. This document is a detailed user guide on how to use the code to evaluate products supported with Mbed code. It explains in more detail, the Mbed setup instructions written in the README.txt. The hardware setup instructions depends on the product and evaluation board used and will be explained in the README.txt.
Mbed Setup
- Go to Mbed web page https://www.mbed.com and click Log in/sign Up button on top right. Create an Mbed account or log in. Please note the username you are using. Open the online compiler by clicking the yellow button on the top right. This is what the compiler will look like:

- Add SDP-K1 board to your compiler by going to https://os.mbed.com/platforms/SDP_K1/ and click on Add to your Mbed Compiler button on the bottom right.


Running Code on Mbed
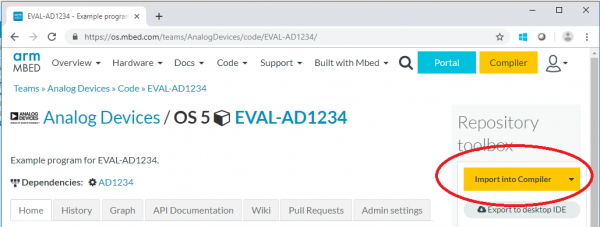
- On the product web page, find the link to Mbed example code, say EVAL-AD1234. Click Import Into Compiler. This should import the entire project, along with libraries.
- Click Compile. This should download a binary file, «program_name».SDP_K1.bin. Find the file in your Downloads folder.
- To program the SDP-K1 board, connect the SDP-K1 board to your computer using the USB cable provided. You should see the board as a new drive on your computer. Copy the binary file into the Mbed enabled board drive. You can also drag and drop the file, like a USB stick.
- Connect the evaluation board and follow the demo manual for the evaluation board to set up the board as required.
- To communicate with the board, use your favorite Terminal program, like Putty, Tera Term etc. To use Putty, download and install Putty from here. Here are some installation instructions. Open Putty and select Serial connection type. Enter the serial port number and baud rate. Click Open.
NOTE: You can find the serial port (which constantly changes, every time you plug a device in), by checking device manager.


resources/tools-software/mbed.1563906376.txt.gz · Last modified: 23 Jul 2019 20:26 by malavika sajikumar