


This version is outdated by a newer approved version. This version (13 Feb 2018 11:32) was approved by Pranit Jadhav.The Previously approved version (08 Feb 2018 16:12) is available.
This version (13 Feb 2018 11:32) was approved by Pranit Jadhav.The Previously approved version (08 Feb 2018 16:12) is available.This is an old revision of the document!
Table of Contents
EV-COG-AD4050LZ with IAR Embedded Workbench for ARM
IDE Setup
- Install IAR Embedded Workbench for ARM
- Please visit https://www.iar.com/ to download IAR Embedded Workbench for ARM (version 8.20.1 or above).
- License Installation
- Make sure valid license is installed for the corresponding version.
- Update support files
- Update the default flashloader and linker file in the following IAR installation directory. Files are attached in the zip format below. (without these changes there will be issue during download and debug.)
- Flashloader file (FlashADuCM4050.board, FlashADuCM4050.out, FlashADuCM4050.mac, flash) - copy these files from the unzipped folder and paste them into “<IAR installation directory>\arm\config\flashloader\AnalogDevices”
- Linker file (ADuCM4050.icf) - copy file from the unzipped folder and paste into “<IAR installation directory>\arm\config\linker\AnalogDevices”.
Software Packs and Driver Setup
- Download the following packs for EV-COG-AD4050LZ
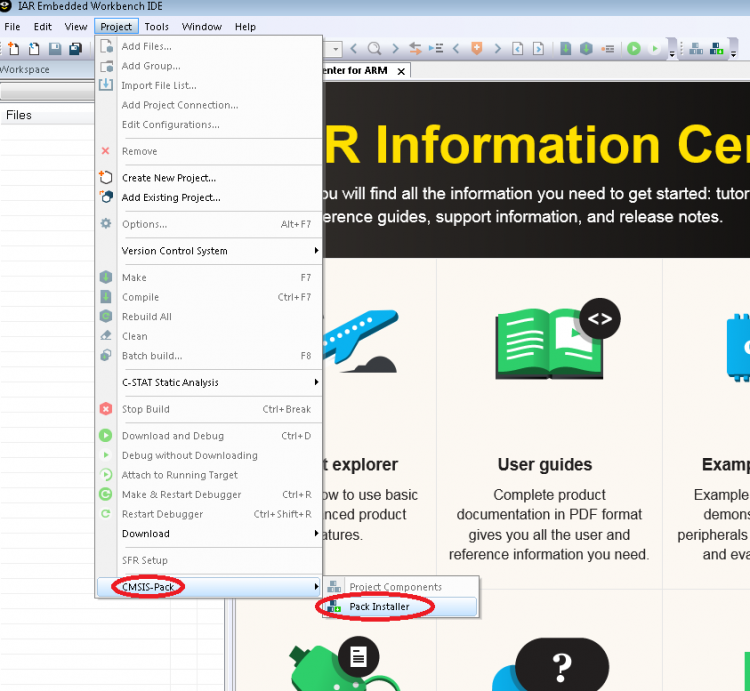
- Start IAR Embedded Workbench for ARM.
- Go to Project→ CMSIS-Pack→ Pack Installer.
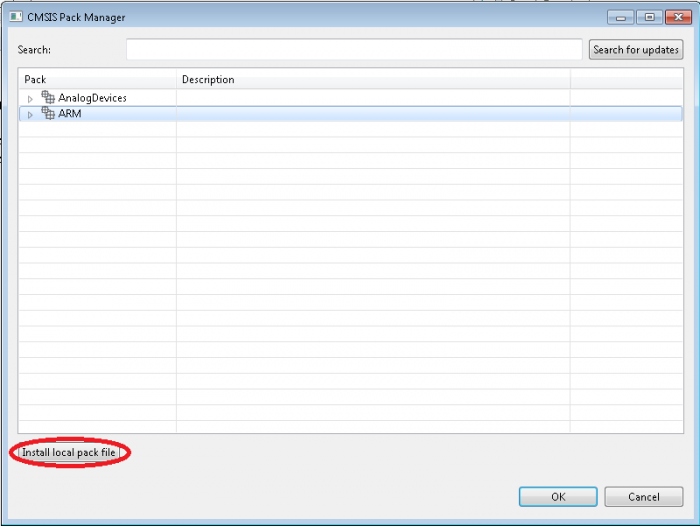
- In 'CMSIS Pack Manager' window, click 'Install local pack file'.
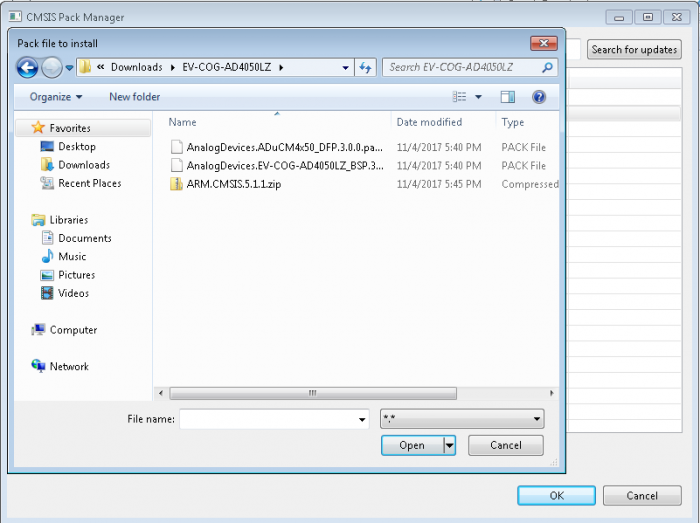
- In 'Pack file to install' window navigate to the downloaded pack (as already done in step 1 of this section), select all the packs to install and click Open.
Running an Example Project
- Power the MCU Cog using a USB (micro-B) Cable. You should see a red LED and a yellow LED turn on by default.

- In IAR IDE, go to Project→ Create New Project…

- In 'Create New Project' window, Select 'CMSIS Pack Example' and click 'OK'.

- Expand Analog Devices, select ADuCM4050 and click 'Next'.

- Select button_press example and click 'Finish'.

- Save the project to the desired location.
- Click on 'Debug and Download' icon
 on the menu bar. This will compile, build and download the project on EV-COG-AD4050LZ using CMSIS-DAP.
 - Click on 'Run' icon
 to start the debug session.
 - Now press BTN1 or BTN2 on EV-COG-AD4050LZ and inspect corresponding LED
You are all set!
End Document
resources/eval/user-guides/ev-cog-ad4050lz/quickstart_guide/iar.1518507827.txt.gz · Last modified: 13 Feb 2018 08:43 by Pranit Jadhav