


This version is outdated by a newer approved version. This version (20 Aug 2019 17:39) was approved by Doug Ito.The Previously approved version (17 May 2019 20:12) is available.
This version (20 Aug 2019 17:39) was approved by Doug Ito.The Previously approved version (17 May 2019 20:12) is available.This is an old revision of the document!
Table of Contents
Quick Start Guide for testing the AD9213 ADC Evaluation Board using the ADS8-V1EBZ FPGA based Capture Board
Typical Setup

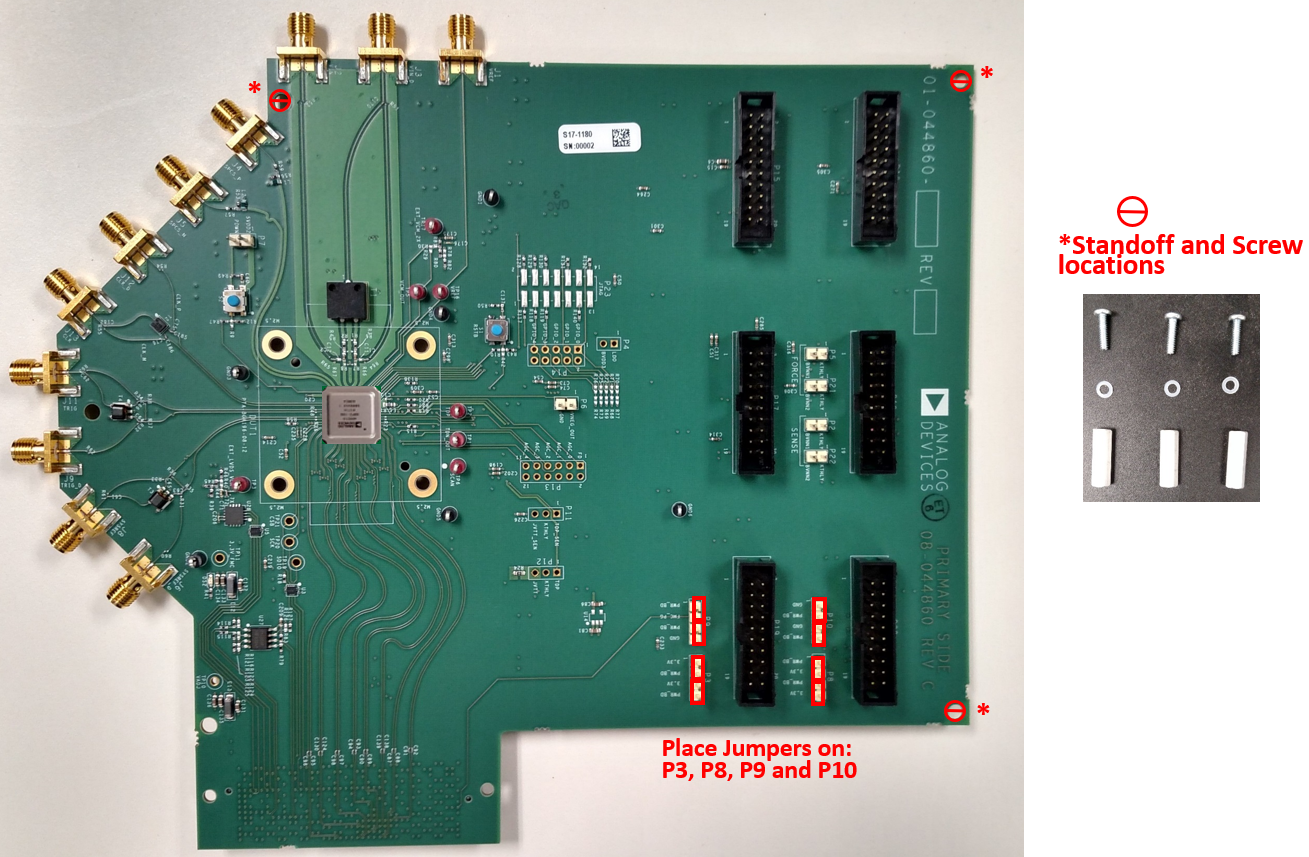
Figure 1. AD9213 Evaluation Board and ADS8-V1EBZ Data Capture Board
Equipment Needed
- Signal Generators
- Analog signal source: The frequency and power requirements depend on the tests to be performed. A bandpass filter is often used for single tone tests.
- Analog clock source: The clock signal generator should have very low phase noise, and be capable of supplying a 10Ghz clock signal (or 6 GHz clock signal for the the 6Gsps speed grade of AD9213) at about 10dBm.
- Reference clock source: For AD9213-10GEBZ with 16 output lanes, at 10Gsps, the frequency of REFCLK is 625MHz. For AD9213-6EBZ configured for 8 output lanes, at 6Gsps, the frequency of REFCLK is 750MHz. For AD9213 the frequency of REFCLK is the digital output lane rate divided by 20.
- PC running Windows®
- USB port and cable to connect to PC
- AD9213 Evaluation Board
- AD9213 Regulator Board (supplies power to the ADC board)
- ADS8-V1EBZ FPGA Based Data Capture Board, with power supply
Helpful Documents
- AD9213 Preliminary Data Sheet
Software Needed
- Analysis Control Evaluation (ACE) software: available at http://www.analog.com/en/design-center/evaluation-hardware-and-software/ace-software.html
Testing
- Install Analysis | Control | Evaluation (ACE) Software. The installer is located at http://www.analog.com/en/design-center/evaluation-hardware-and-software/ace-software.html. After the installation, and after starting the program, the first window to appear is a Start page that contains a view of the plugins that are released. Check if the AD9213 appears in the pre-installed list of released plugins.
- If the AD9213 plugin is not in the pre-installed list, the installer for a functional version is available here board.ad9213.0.1.7.zip. Download the AD9213 plugin installer and double-click on this executable. It will automatically install the AD9213 ACE plugin. Perform this step without the board connected to the PC.
- Close ACE.
- Install jumpers on P3, P8, P9, P10 as shown.
 Standoffs can be installed at the *locations if desired. Alternatively, foam sheets can be used to support the board. </WRAP>
 - Connect the AD9213 evaluation board to the regulator board. The connectors mate as shown. With the boards parallel to each other, carefully align the connectors, then press the boards together applying even pressure over the connectors to avoid stressing and flexing the boards. The connectors are keyed so it is impossible to insert the board with the incorrect orientation.

- Connect the AD9213 evaluation board/regulator board combo to the ADS8-V1EBZ board together as shown in Figure 1. Align the FMC+ connectors and apply even pressure across the connector and press the FMC connector on to its counterpart on the FPGA board.
- Connect signal, clocks, power and USB cables to the boards as shown in Figure 1.
- Signal (J3): The frequency and amplitude of the test signal depend on the type of test being performed. Full scale is typically achieved at 9dBm – 12dBm signal power at the signal generator, depending on frequency. If in doubt about what amplitude to use, start with a lower amplitude (e.g. 4dBm at the signal generator) and work up or down from there.
- Note: In Figure 1 the input signal is shown being applied to RF connector J3. As can be seen, the trace from J3 goes to the balun, where the single ended signal is converted to differential. On some board revisions the trace to the balun comes from RF connector J2. In those cases the input signal must be applied to J2.

- Sample clock (J13): The sample clock works well across a wide range of amplitudes (1dBm – 10dBm at the signal generator). Because jitter performance is likely to improve as the slew rate increases, choose an amplitude towards the upper end of the stated range.
- Reference Clock (ADS8-V1EBZ J1): Like the sample clock, the reference clock works well across a wide range of amplitudes (1dBm – 10dBm at the signal generator). Unlike the sample clock, the reference clock is not sensitive to jitter/phase noise. Any signal generator that meets the frequency and power requirements will work. For AD9213 the frequency of the reference clock is the (output digital data rate)/20.
- Example: For the default JESD204B output configuration of AD9213-10GEBZ (L = 16, N’ = 16, M = 1) at 10Gsps, the output data rate is 12.5Gbps. Reference clock frequency =12.5G/20 = 625MHz.
- Example: For AD9213-6GEBZ, ACE brings the part up in 8-Lane mode. In this case (L = 8, N’ = 16, M = 1) at 6Gsps, the output data rate is 15Gbps. Reference clock frequency = 15G/20 = 750MHz.
- Connect the USB cable from the ADS8-V1EBZ FPGA board to the Windows PC that has ACE installed.
- Power on the ADS8-V1EBZ FPGA board using the switch S4. Wait several seconds after powering on the ADS8-V1EBZ, until DS17 flashes and the FPGA fan has stopped spinning.
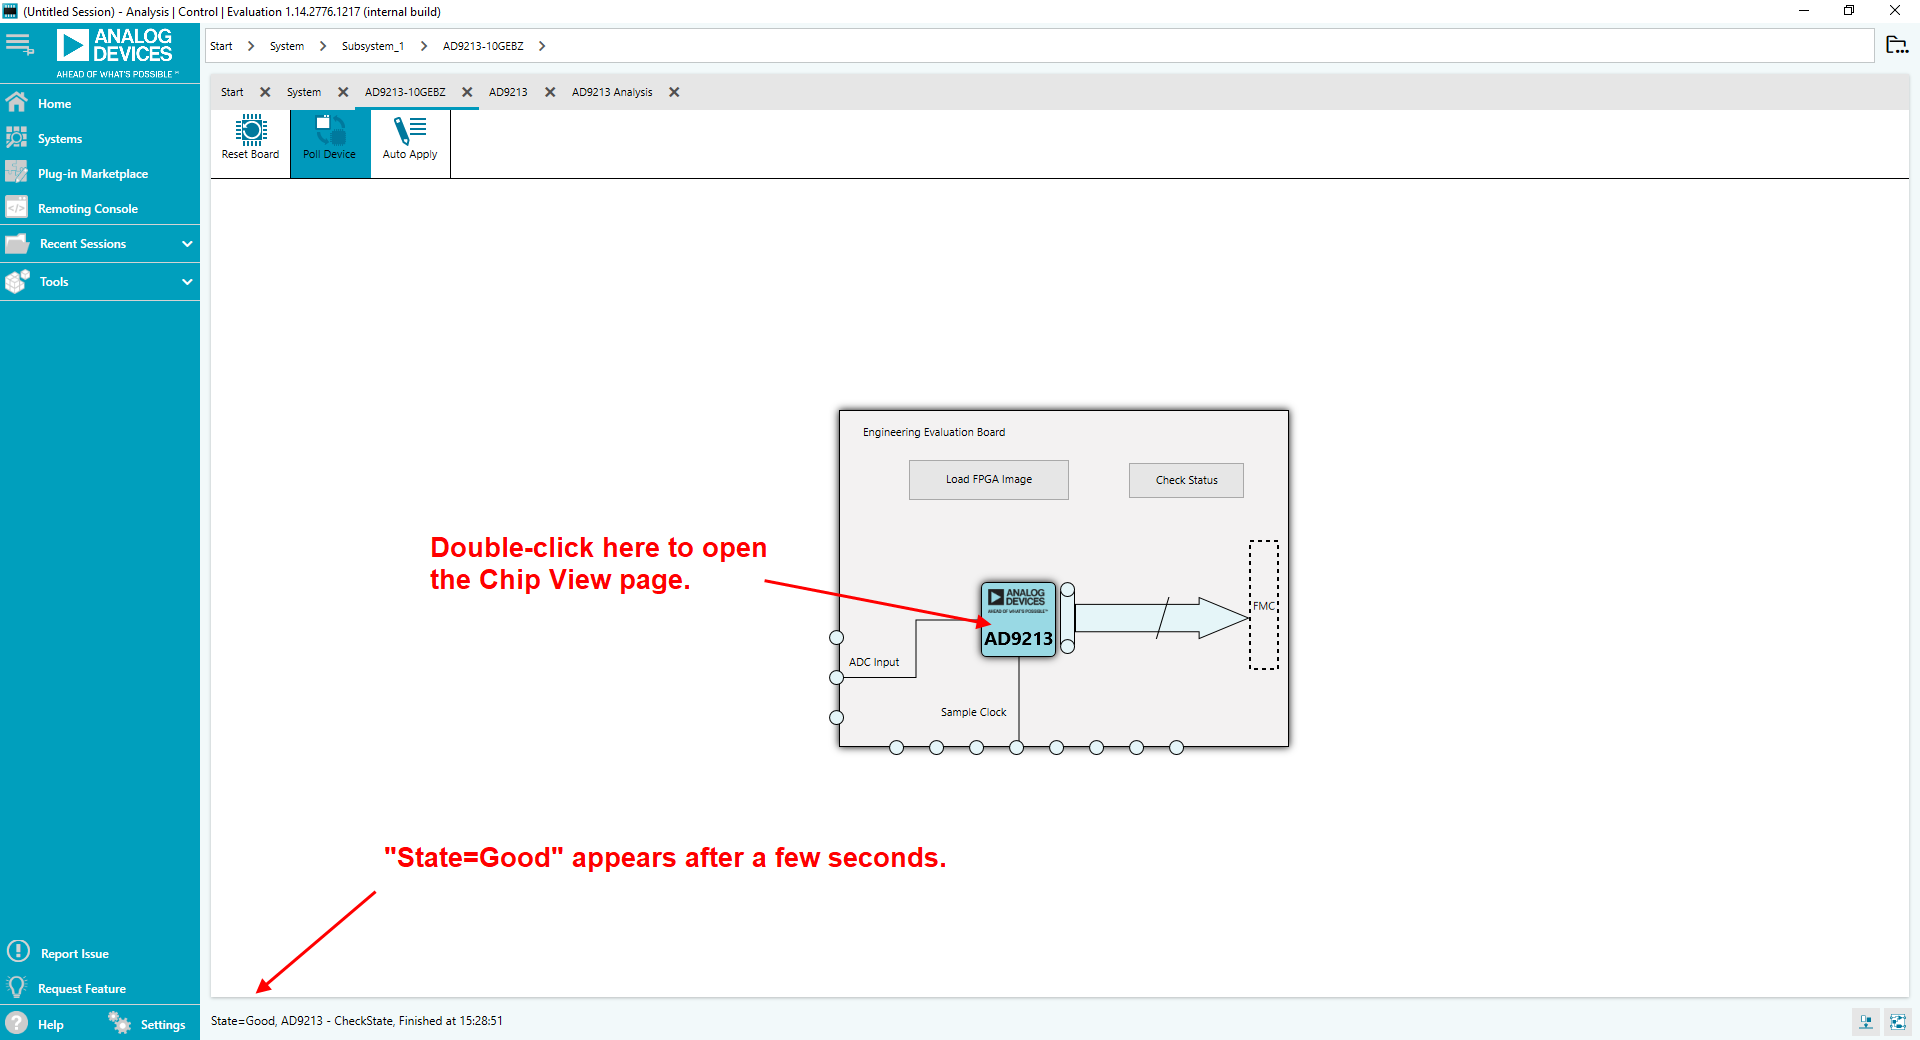
- Start ACE and double click the “AD9213-10GEBZ” or “AD9213-6GEBZ” icon.

- “Unknown” will initially appear in the lower left corner. Wait until “Unknown” changes to “Good”.

AD9213 board view
- After “State=Good” appears in the lower left, turn on the signal generators for clock, reference clock, and signal.
- Double-click the AD9213 icon to bring up the Chip View.

AD9213 board view with “State=Good”
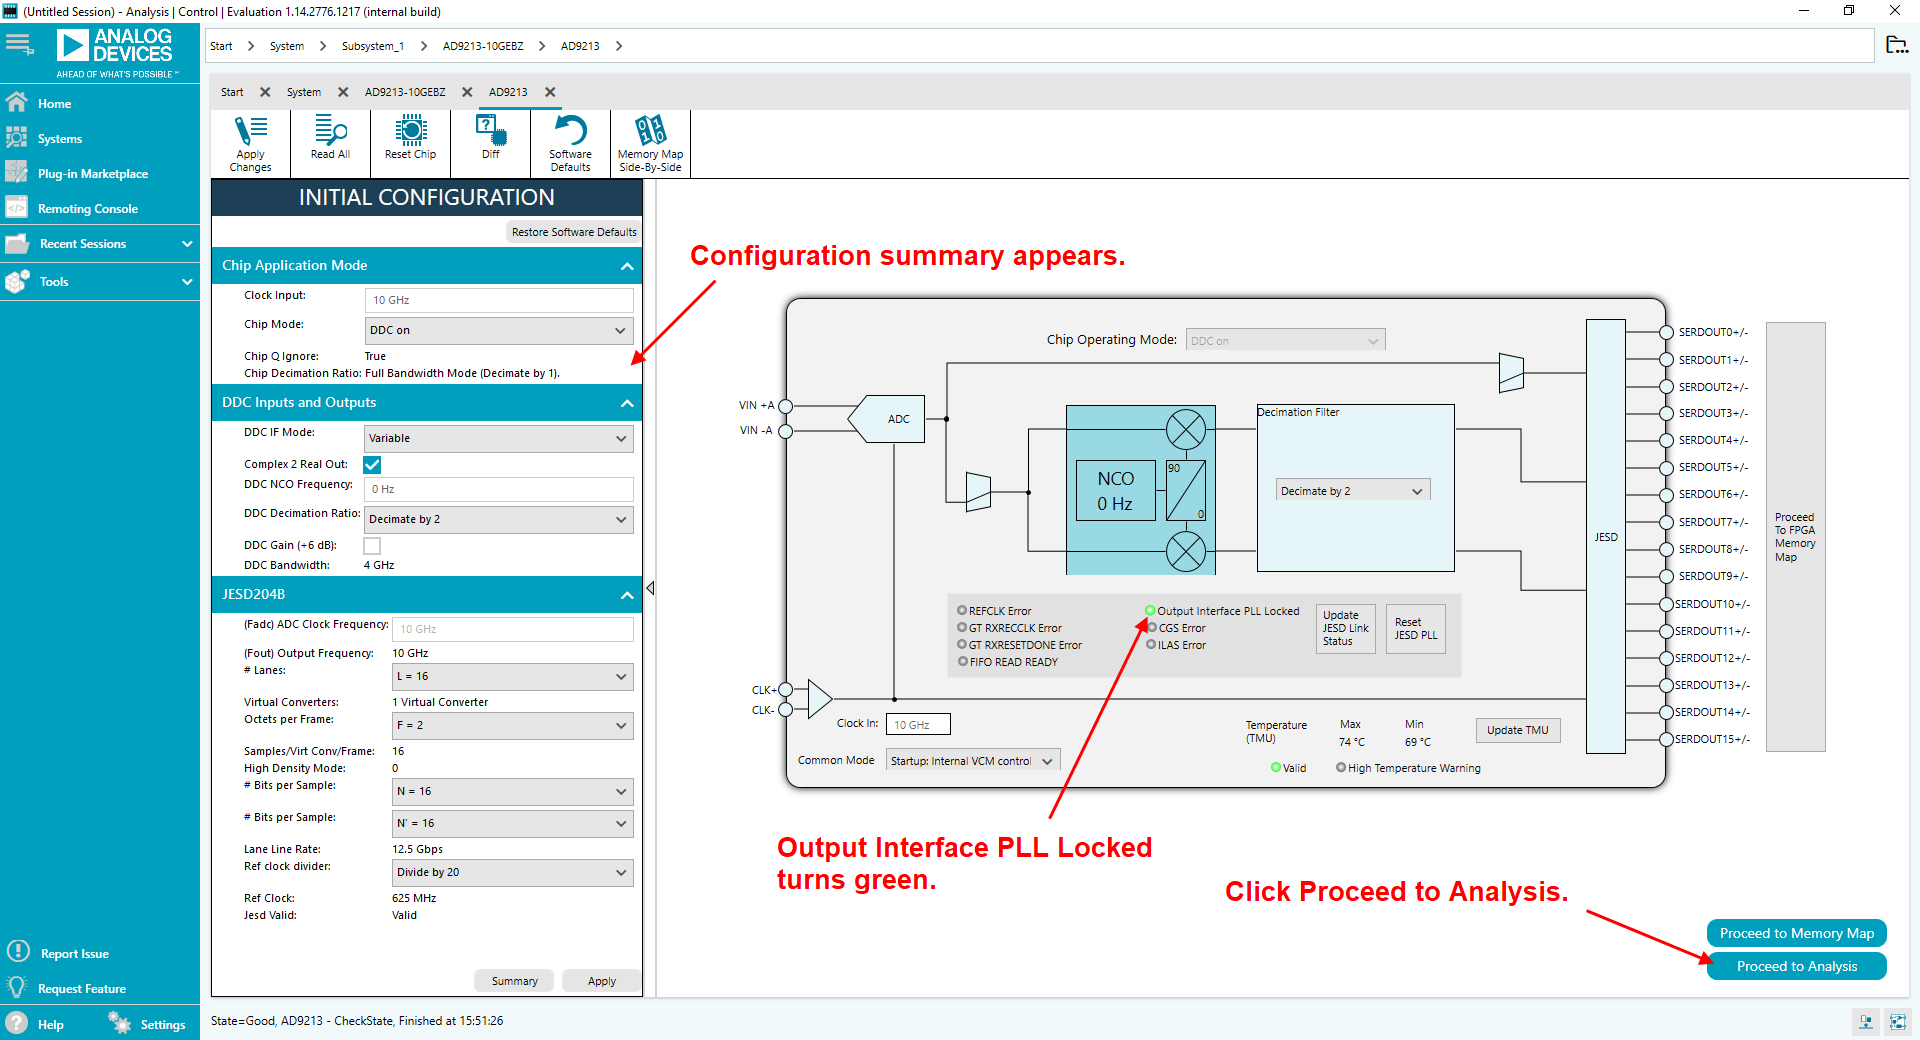
- Click the Apply button to configure AD9213 in its default configuration

AD9213 chip view

After applying the default configuration
- AD9213 DDC and NCO controls have been added to the configuration wizard. The image below gives a summary of the settings.

- Click the “Proceed to Analysis” button. The analysis page will appear.
- Click “Run Once” to get a time domain look at the converted data.

- Click on the “FFT” icon to see the frequency domain view (FFT).

Analysis page with Time Domain data
- “Run Continuously” can be clicked to view repetitive FFTs.

FFT


Notes
- Assuming the hardware is properly setup, if at any point the ACE startup procedure does not proceed as described and/or expected:
- Close ACE software
- Power down the ADS8-V1EBZ using switch S4
- Sometimes this must be repeated several times
- If after repeated tries the ACE startup procedure is not successful:
- Check that jumpers are placed on the AD9213 evaluation board as shown in Step 4.
- Check that all signal generators are on and at the correct frequencies and power levels.
- On the Regulator Board, check that 3.3V appears at TPS.
ad9213.1566315485.txt.gz · Last modified: 20 Aug 2019 17:38 by Doug Ito