


This version (08 Jan 2021 23:29) was approved by Robin Getz.The Previously approved version (03 Jan 2021 21:43) is available.
Table of Contents
Custom A2B Configuration for SHARC Audio Module
This page describes the steps necessary to create A2B topologies (system configuration files) different to the fixed topologies currently supplied with the SHARC Audio Module (SAM) Baremetal Framework SDK.
The setup discussed on this page consists of the SHARC Audio Module, used in combination with the EVAL-AD2428WB1BZ and ADZS-AUDIOA2BAMP class-D amplifier A2B slave boards, as per the A2B SigmaStudio schematics.

Required Software Components
The following software components must be installed prior to using this custom demo:
- CrossCore Embedded Studio(CCES) development tools (version 2.9.2)
- SHARC Audio Module Bare Metal SDK (version 2.1.1)
- SigmaStudio (version 4.5)
- A2B Software package (version 19.3.1)
After installing this package, copy A2B.dll and A2Bstack.dll from the “\GUI\x86_x64” folder into “C:\Program Files\Analog Devices\SigmaStudio 4.5” before launching SigmaStudio
- Extract the supplied .zip file: Demo SAM-WB1BZ-ClassDAmp.zip
Required Hardware Components
The following hardware components are required to run this custom demo:
- ADZS-SC589-MINI SHARC Audio Module (master board)
- EVAL-AD2428WB1BZ (slave board)
- ADZS-AUDIOA2BAMP (slave board)
- ADZS-USBI2EZB (USBi programmer)
- Two A2B® cables
- Two passive speakers
- Stereo aux cables and headphones
Hardware Setup
The hardware setup and audio routing used for running this particular custom demo consists of the following:
- Audio source (Line In) into SHARC Audio Module
- A2B routing from SAM(master) to AD2428WB1BZ (slave 0)
- AD2428WB1BZ audio sink (Line Out)
- A2B routing from AD2428WB1BZ (slave 0) to AUDIOA2BAMP (slave 1)
- AUDIOA2BAMP Class-D amplifier to audio sink (passive speakers)

Creating Topology Files For the Bare Metal Framework
The following steps describe the procedure required for running the demo:
For this tutorial, the SigmaStudio schematics from the zip file will be used.
- The custom A2B topology system configuration files need to be generated using SigmaStudio.
- Create new System Config Files by clicking “Link, compile and download” for the “Demo SAM-WB1BZ-ClassDAmp (RevA).dspproj” project schematics.
- After successful compilation, right click on the “Target Processor” and select “Export System Config Files..”

- The “Export A2B Configuration Files” pop-up window will appear
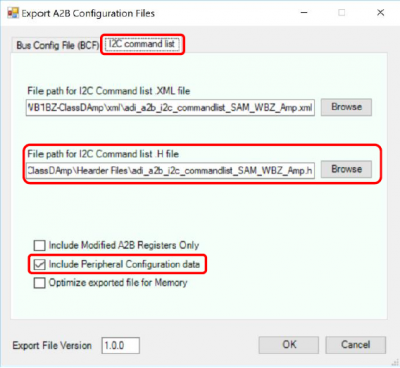
- Be sure to set the appropriate settings to generate the new A2B topology configuration file.
- Click OK and then close the window (it doesn't automatically close)
Adding Topology Files To the Bare Metal Framework
Use the Bare Metal Project Wizard to create a project that the topology files will be integrated into.
Reference the Bare Metal Project Wizard page for help creating a project.
The Bare Metal Project Wizard for the SHARC Audio Module Bare Metal SDK version 2.1.0 does not support custom hardware configurations. For purposes of this exercise, you should select one of the two options on the A2B module Selection page: Class-D Amplifier A2B Module or Another SHARC Audio Module.

- Copy the previously A2B configuration header file to the SAM A2B topologies folder in the newly created bare metal project

- In CrossCore Embedded Studio (CCES 2.8.3 or later), a few code edits are required so that this new A2B configuration file can be invoked from the framework.
- Under core0 → src → common, edit the “audio_system_config.h” file to add the new topology, as shown below:

- Next, under core0 → src → audio_frameworks, navigate to “audio_framework_8ch_sam_and_audioproj_fin_arm.c”. Add the new A2B configuration, as shown below. Include the previously created header file “adi_a2b_i2c_commandlist_SAM_WBZ_Amp.h”

- At this stage, the newly created A2B topology should be properly configured and ready to be compiled and downloaded to the SHARC Audio Module board.
For details on the default audio routing to the A2B bus, under core1 → src, navigate to “callback_audio_processing.cpp”. Also, refer to SigmaStudio “Stream Config” under “Target Processor” for more details on the configured streams.
Executing the Code in CCES
Some knowledge of CrossCore Embedded Studio(CCES) is assumed here. If unfamiliar with CCES, please go through the CCES Getting Started Guide prior to working in CCES.

- Build all 3 core projects
- Create the debug configuration to load all 3 cores using the ICE-1000
- After creating the debug configuration, click Debug
- Core 0 needs to run first to release the 2 SHARC cores so that they run to main
- Once the SHARC cores are at main, run both cores
- Be sure you have audio input to the board
- You should hear audio a few octaves higher than expected
Navigation - SHARC Audio Module
resources/tools-software/sharc-audio-module/baremetal/custom-a2b-topology.txt · Last modified: 08 Jan 2021 23:23 by Robin Getz