 This version (13 Jan 2016 23:20) is a draft.
This is an old revision of the document!
CN-0216 is a precision weigh scale signal conditioning system. It uses the AD7791, a low power buffered 24-bit sigma-delta ADC along with dual external ADA4528-2 zero-drift amplifiers. This solution allows for high dc gain with a single supply.
Ultralow noise, low offset voltage, and low drift amplifiers are used at the front end for amplification of the low-level signal from the load cell. The circuit yields 15.3 bit noise-free code resolution for a load cell with a full-scale output of 10 mV.
This circuit allows great flexibility in designing a custom low-level signal conditioning front end that gives the user the ability to easily optimize the overall transfer function of the combined sensor-amplifier-converter circuit. The AD7791 maintains good performance over the complete output data range, from 9.5 Hz to 120 Hz, which allows it to be used in weigh scale applications that operate at various low speeds.
The EVAL-CN0216-ARDZ evaluation board is compatible with the Arduino Shield form factor. This user guide will discuss how to use the evaluation software to collect data from the EVAL-CN0216-ARDZ Evaluation Board (CN-0216 Board)
A complete design support package for the EVAL-CN0216-ARDZ evaluation board containing schematics, layouts (native and Gerber), and bill-of-materials can be found at: CN0216-Shield-DesignSupport.
NOTE - Any 4 or 6 wire load cells can be used with the CN-0216 Board.
This guide was written with the Tedeah Huntleigh Model 1042 in mind.
OPTIONAL:
—-

Jumper Settings

NOTE: If a different Load Cell is used other than the
Tedeah-Huntleigh Model 1042, the wiring schematic will be different!


The Arduino IDE is used for programming Arduino processor boards. The IDE may be downloaded from the Official Arduino Downloads Page. Download and install the Arduino IDE to get started. Helpful guides may also be found on the Getting Started with Arduino webpage.
To learn more about libraries and how to install them to your Arduino IDE, please visit this page.
Example code and library files are available for the CN0216 and many other projects can be downloaded from our Github repository. Simply by using the “Download Zip” button.
To Install the software libraries, extract the library files to your My Documents/Arduino/libraries directory
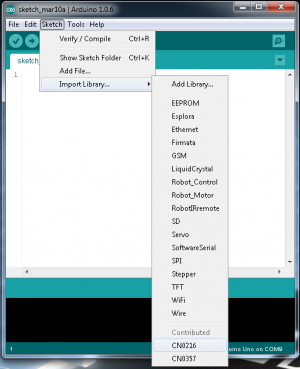
To add the AD7791 libraries to your Arduino project, navigate to the Sketch-->Import Library menu option. Select AD7791

To learn more about libraries, please visit the Arduino Libraries Guide.
The example code is available for download here:Example code on Git hub
The libraries needed are located here:Arduino Libraries on Git hub
The example code demonstrates how to configure the system, perform 2-point calibration, read data and display the data using UART/serial interface.