


This version is outdated by a newer approved version. This version (30 May 2017 22:16) is a draft.
Approvals: 0/1
This version (30 May 2017 22:16) is a draft.Approvals: 0/1
This is an old revision of the document!
Table of Contents
Accelerometer Demo using Wi-Fi (with EVAL-ADXL362-ARDZ)
The ADuCM3029_demo_esp8266 is a Wi-Fi demo project for the EVAL-ADICUP3029 base board with additional EVAL-ADXL362-ARDZ shield, created using the Analog Devices Cross Core Embedded Studio.
General Description/Overview
The ADuCM3029_demo_esp8266 project uses the EVAL-ADXL362-ARDZ shield which has an ADXL362 3-axis MEMS accelerometer and a incorporated NHD-C12832A1Z-NSW-BBW display (128×32). However, for this example the display is not used.
The EVAL-ADICUP3029 is designed for IOT (Internet of Things) applications in mind, and therefore comes with on board Wi-Fi ESP8266 module.
Also, in order to fully make use of the IOT capability, MQTT messaging protocol is used as it is extremely simple and lightweight.
Setting up the Hardware
- Move the S2 switch to the WiFi position:

- Plug the ESP8266 in the P1 connector:

- Plug the EVAL-ADXL362-ARDZ shield in the EVAL-ADICUP3029 base board:

- Plug the USB cable
Configuring the Software
This example uses the Eclipse Mosquitto which is an open source (EPL/EDL licensed) message broker that implements the MQTT protocol versions 3.1 and 3.1.1. MQTT provides a lightweight method of carrying out messaging using a publish/subscribe model. This makes it suitable for “Internet of Things” messaging such as with low power sensors or mobile devices such as phones, embedded computers or microcontrollers.
The program connects to a WiFi network and to a TCP MQTT broker. After receiving the SUBACK confirmation from the server, the program enters an infinite loop where it waits for an ADXL-362 interrupt which is triggered when the acceleration on any axes is greater than 50 mG. Afterwards, the program publishes the x, y, z readings on adxl topic. A subscriber to this topic can view this information.
- Double click the downloaded .exe file
- Click next and finish the installation
- If everything is now in place, you should be able to run mosquitto. Open a Command Prompt and navigate to the folder where mosquitto is installed. The default location is C:\Program Files (x86)\mosquitto
- Type mosquitto.exe -v to start the broker in verbose mode:

- The mosquitto broker is now running locally and has the same IP as your machine and by default runs on port 1883. Open a new Command Prompt and type ipconfig to get your local IP address
- In the ESP8266.h header file you need to configure the following parameters: SSID - Service set identifier, which is the name of the WiFi network to connect the ESP8266, PASS - WiFi network password, MQTT_SERVER - IP of the mosquitto broker from the previous step, PORT - by default is 1883
Outputting Data
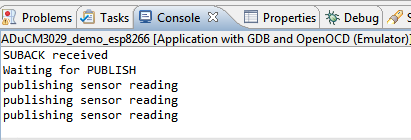
- You are now ready to run the program. If everything works fine, in the CrossCore Embedded Studio console you should see:

- The program has connected to the local WiFi network, to the TCP mosquitto broker, subscribed to subtopic an received SUBACK as a confirmation from the broker.
- The program will publish x, y, z data on the adxl topic. In order to view this information, we can use mosquitto_sub and subscribe to the adxl topic.
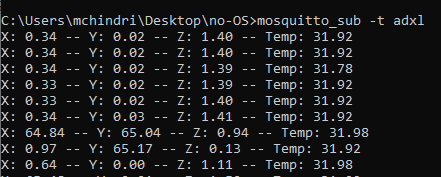
- Open another Command Prompt and navigate to the folder where mosquitto is installed and type mosquitto_sub -t adxl:

- At each ADXL-362 movement, an interrupt is triggered and as a result, the x, y, z information is published. In the console publishing sensor reading message is displayed, while in the mosquitto_sub cmd window you should see the values of x, y, z axis:
Obtaining the Source Code
We recommend not opening the project directly, but rather import it into CrossCore Embedded Studios and make a local copy in your workspace.
The source code and include files of the AduCM3029_demo_esp8266 can be found here:
How to use the Tools
The official tool we promote for use with the EVAL-ADICUP3029 is CrossCore Embedded Studio. For more information on downloading the tools and a quick start guide on how to use the tool basics, please check out the Tools Overview page.
Importing
For more detailed instructions on importing this application/demo example into the CrossCore Embedded Studios tools, please view our How to import existing projects into your workspace section.
Debugging
For more detailed instructions on importing this application/demo example into the CrossCore Embedded Studios tools, please view our How to configure the debug session section.
Project Structure
 ! - Add text, picture, images, that describe the project structure. Any software flow diagrams or decision trees can be added her to help customers understand how the applications are structures.
End of Document
resources/eval/user-guides/eval-adicup3029/reference_designs/demo_adxl362.1496175363.txt.gz · Last modified: 30 May 2017 22:16 by Brandon Bushey