


This version is outdated by a newer approved version. This version (15 Sep 2017 10:04) is a draft.
Approvals: 0/1
This version (15 Sep 2017 10:04) is a draft.Approvals: 0/1
This is an old revision of the document!
Table of Contents
CN0241 High-Side Current Sensing with Input Overvoltage Protection
Overview
High-side current monitors are likely to encounter overvoltage conditions from transients or when the monitoring circuits are connected, disconnected, or powered down. This circuit uses the overvoltage protected ADA4096-2 op amp connected as a difference amplifier to monitor the high-side current. The ADA4096-2 has input overvoltage protection, without phase reversal or latch-up, for voltages of 32V higher than and lower than the supply rails.
The circuit is powered by the ADP3336 adjustable low dropout 500 mA linear regulator, which can also be used to supply power to other parts of the system, if desired. Its input voltage can range from 5.2V to 12V when set for a 5V output. To save power, the current sensing circuit can be powered down by removing power to the ADP3336; however, the power source, such as a solar panel, can still operate.
This applies voltage to the inputs of the unpowered ADA4096-2; however, no latch-up or damage occurs for input voltages up to 32V. If slower throughput rates are required, the AD7920 can also be powered down between samples. The AD7920 draws a maximum of 5 μW when powered down and 15 mW when powered up. The ADA4096-2 requires only 120 μA under operational conditions. When operating at 5V, this is only 0.6 mW. The ADP3336 draws only 1 μA in the shutdown mode.
 image
image
Required Equipment
- DC power supply capable of driving 6 V/1 A
- DC power supply capable of driving 5 V/2.5 A
- 2 Ω/12 W load resistor
- PC (Windows 7) with USB interface
General Setup
Block Assignments
 image
image
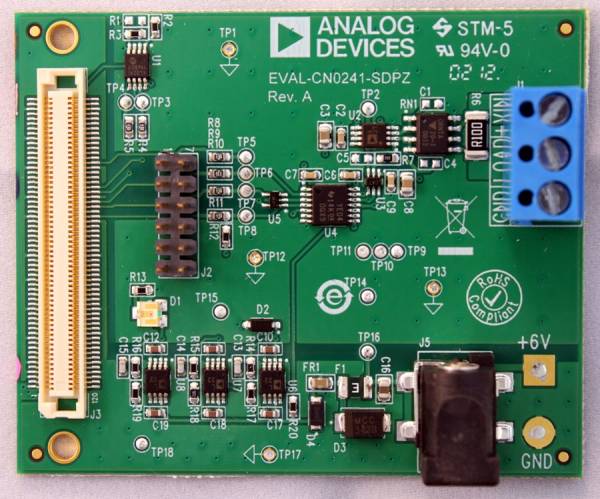
- Connect EVAL-CN0241-SDPZ (CN0241 Board) to the EVAL-SDP-CB1Z (SDP-B Board) via the 120-PIN Connector (SDP CONN).
- Connect a 6V power supply to the +6V and GND pins on the board. If available, a 6 V wall wart can be connected to the barrel connector, J5, in place of the 6V power supply.
- Connect the 5V/2.5 A dc supply to +VIN and GND on J1. Also connect the 2 Ω/12 W load resistor to LOAD and GND on J1.

Installing the Evaluation Software
- Download and extract the file CN0241 Evaluation Software and open setup.exe
NOTE: It is recommended that you install the CN0241 Evaluation Software to the default directory path C:\Program Files (x86)\Analog Devices\CN0241\ and all National Instruments products to C:\Program Files\National Instruments\

- Click Next and accept license agreement.

- Click Next to view the installation review page

- Click Next to start the installation

- Upon completion of the installation of the CN0241 Evaluation Software, the installer for the ADI SDP Drivers will execute.
NOTE: It is recommended that you close all other applications before clicking “Next”. This will make it possible to update relevant system files without having to reboot your computer.

- Click Next to set the installation location for the SDP Drivers
It is recommended that you install the drivers to the default directory path
C:\Program Files\Analog Devices\SDP\Drivers

- Click Next to install the SDP Drivers. When prompted by Windows Security, just press Install

- Click Finish to complete the installation

Using the Evaluation Software
Main Window

- Title Bar
- Connect Button - Starts the connection between the CN0241 Evaluation Board and SDP-B Controller Board.
- Disconnect Button - Ends the connection between the CN0241 Evaluation Board and SDP-B Controller Board.
- Menu Bar
- Select SDP connector - Selects which 120-pin connection of the SDP-B Board to use.
- Sample Size
- Sample Data Button - Starts the acquisition of measurement data.
- Save Data Button - Saves the acquired measurement data.
- Selection Tab
- Sample Data Tab

- Shows the acquired measurement data in terms of ADC codes with respect to the samples.
- By right-clicking within the area, more functions can be viewed. Graph palette can be hidden by deselecting it and also other items can be added such as plot legend, scale legend, etc.
- Histogram Tab
- Shows the acquired measurement data in terms of Number of counts with respect to the ADC codes
- The same as the previous tab, by right-clicking within the area, more functions can be viewed. Other items can be added such as plot legend, scale legend, etc.
- Configure Tab

- AD7920 Mode - Can choose between two modes:
- Power Down Between Conversions
- Normal Operation
- Read Firmware - Reads the firmware of CN0241 Evaluation Board
- Flash LED - Flashes the LED on the SDP controller board
- Quit Button
- Closes the evaluation software.
Running the System
- Apply power to the 6V supply (or wall wart) connected to the CN0241 evaluation board.
- Connect USB cable from PC to the USB miniconnector on the SDP-B board.
- Launch CN0241 Evaluation Software from the default installation location.
- Click “Connect” to start communication between SDP-B and CN0241.
- Upon successful connection, select SDP connector used, either connector A or connector B.
- Set the desired number of samples.
- Turn the 5 V/2.5 A dc supply on when data is ready to be acquired.
- Adjust the voltage output accordingly to output the amount of current needed to be measured
- Click “Sample Data” to start acquisition of data.
resources/eval/user-guides/circuits-from-the-lab/cn0241.1505462659.txt.gz · Last modified: 15 Sep 2017 10:04 by Trecia Agoylo