


This version is outdated by a newer approved version. This version (13 Feb 2018 11:34) was approved by Pranit Jadhav.The Previously approved version (12 Aug 2017 09:12) is available.
This version (13 Feb 2018 11:34) was approved by Pranit Jadhav.The Previously approved version (12 Aug 2017 09:12) is available.This is an old revision of the document!
Table of Contents
Cross Core Embedded Studio Quickstart User Guide
This page describes how to use the ADuCM4x50 Device Family Pack (DFP) with CrossCore Embedded Studio (CCES) to create, import, build and debug applications for the ADuCM4x50 processor. The ADuCM4x50 processor integrates an ARM Cortex-M4 microcontroller with various on-chip peripherals within a single package.
This page describes how to install and work with the Analog Devices ADuCM4x50 DFP to start developing applications for the EV-COG-AD4050LZ. This page also highlights common problems and how to avoid them.
Additional help documentation can be found by opening CCES and selecting “Help Contents” from the CCES Help menu.
This page covers:
- How to install or upgrade the ADuCM4050 Device Family Pack (DFP) for CCES
- How to create a new project for the ADuCM4050
- How to add startup code and core components to a new project for the ADuCM4050
- How to import existing projects into your workspace
- How to build projects for programming the ADuCM4050
- How to configure the Tools Settings used by an ADuCM4050 project
- How to configure the debug session for an ADuCM4050 application
- How to start and stop debugging an ADuCM4050 application
- How to create an Intel Hex (.hex) file from an ADuCM4050 application
Workspace and Projects
A CCES workspace is a folder (e.g. c:\Users\anon\cces\2.6.0) that contains project resources and metadata. When projects are created or imported, details about that project are stored in the workspace. The workspace metadata also includes preferences set through the CCES Preferences dialog box and IDE window layouts. By default, CCES creates new projects within your workspace folder.
Each time you start CCES, you will be prompted for a workspace location. You can opt to default to a workspace directory by choosing to use a workspace directory as your default. You will not be prompted the next time you open CCES.

How to install Packs for CCES
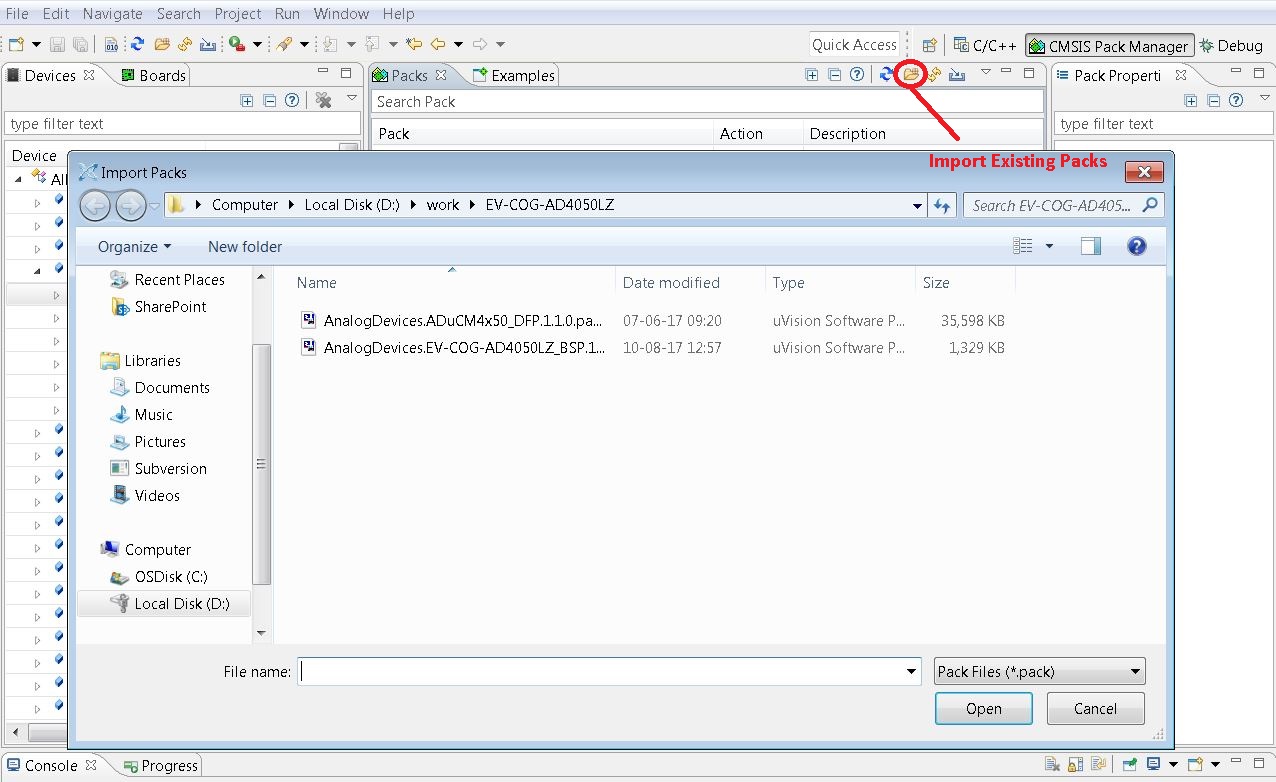
Please download the following packs to your local directory.
After downloading the .pack files, select the Import Packs button in the CMSIS Pack Manager's View, choose the .pack file as shown in the screenshot below and click Open. This will install all the selected packs.
You will be prompted to accept a license agreement and after agreeing to it, Pack file will be installed into CrossCore Embedded Studio's CMSIS-Pack installation directory (e.g. C:\Analog Devices\CrossCore Embedded Studio 2.6.0\ARM\packs\AnalogDevices).
ADuCM4050 Board Support Packs (BSP)
EV-COG-AD4050LZ Board Support Pack
The EV-COG-AD4050LZ Board Support Pack (BSP) provides the drivers for off-chip peripherals which are on the EV-COG-AD4050LZ Evaluation Board and examples for peripherals on the ADuCM4050 processor. The drivers and examples in the BSP are designed to work with CrossCore Embedded Studio and the ADuCM4x50 Device Family Pack (DFP).
For more information on the EV-COG-AD4050LZ BSP, please refer to the User's Guide in the Documents folder (e.g. C:\Analog Devices\CrossCore Embedded Studio 2.6.0\ARM\packs\AnalogDevices\EV-COG-AD4050LZ_BSP\1.0.0\Documents\EV-COG-AD4050LZ_Board_Support_Pack_Users_Guide.pdf)
How to create a new project for the ADuCM4050
A project for ADuCM4050 can be created using the New CrossCore Project Wizard. This wizard will guide you through the steps to create a new project.
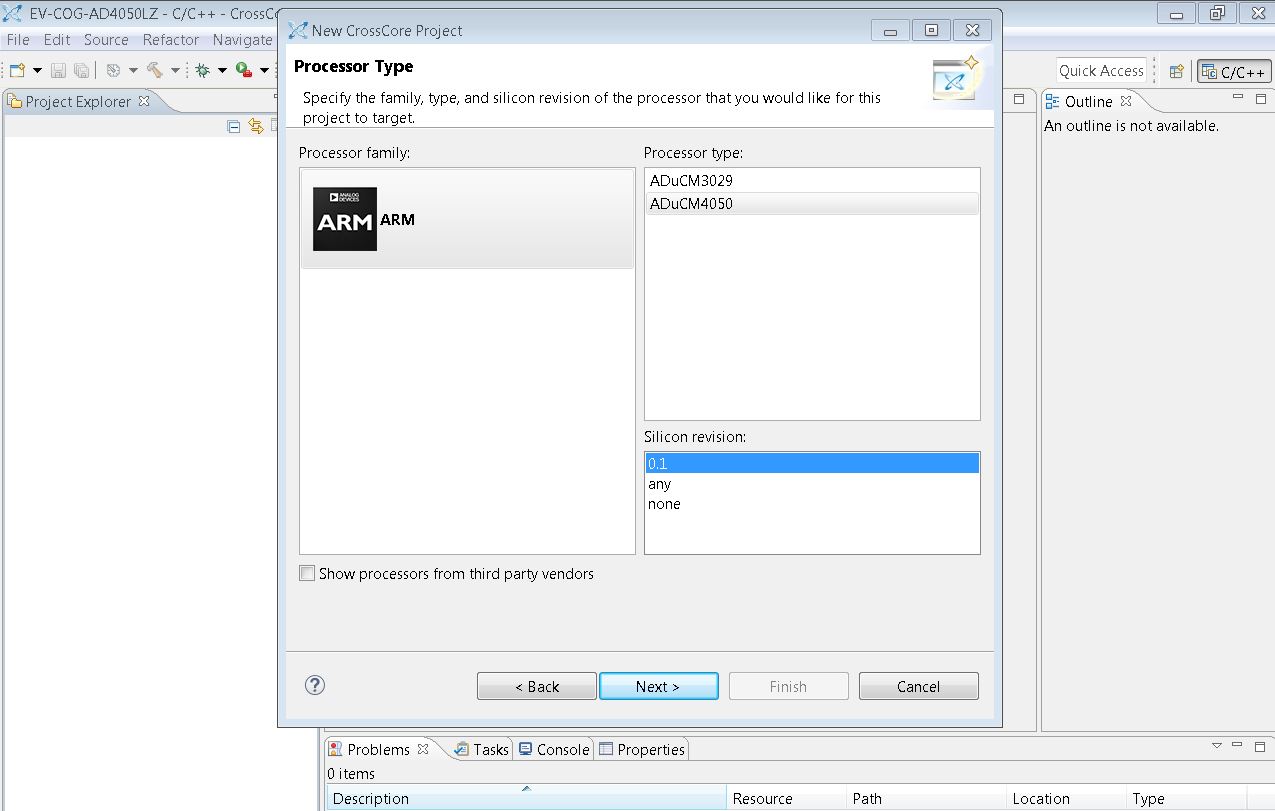
- To create a new project, go to the menu bar and find File → New → CrossCore Project.
- Choose Processor family ARM and select Processor type ADuCM4050 .
- Choose your Silicon revision (default is 1.0).
- A SILICON_REVISION macro will be set in your project's Tools Settings, allowing you to conditionally check the silicon revision in your source code.
- Project configuration allows you to add additional Add-ins to your project, such as Pin Multiplexing and changing the template language for a generated main function etc.
- Finally, press Finish and the project will be created and you can begin writing your program.

How to add startup code and core components to a new project for the ADuCM4050
An out-of-the-box ADuCM4050 project does not have startup code or a linker description file that maps code and data. It is necessary to add these components using the Run-time Environment (RTE) Configuration Editor.
CrossCore Projects created for Analog Devices' Cortex-M based processors, such as ADuCM4050 include a system.rteconfig file. Opening this file within the IDE will open the RTE Configuration Editor. Components from the CMSIS-Pack, such as drivers and services, can be added to a project by selecting them in the editor and clicking Save.
At minimum, a new ADuCM4050 project will require the Device::Startup, CMSIS::Core and Device::Global Configuration components to be added to the project.
- Double-click on the system.rteconfig to open the RTE Configuration Editor.
- Select Device::Startup, CMSIS::Core and Device::Global Configuration.
- Click Save (Ctrl+S)
- You can also choose Device::Startup and click the Resolve button to add dependant components

How to import existing projects into your workspace
There are three(3) methods for importing existing projects:
- Examples that you have saved to a local drive on your PC.
- Examples that come with the ADuCM4050 Device Family Pack (DFP).
- Examples which are in the EV-COG-AD4050LZ GIT repository (most up to date content).
How to Import Existing Projects Saved to a Local Drive
- Select File | Import… from the CCES menu.
- A dialog will pop-up with several importing options, choose the General | Existing Projects into Workspace option, and click Next
- Select Browse in the dialog window and search for the saved project which is on your local drive.
- (Optional) If the Copy projects into workspace option is checked, the project will be copied to your workspace folder and the newly copied project will be opened and used. This preserves the original version of the project.
- Click Finish

How to Import Examples that come with the ADuCM4050 Device Family Pack (DFP) or Board Support Packs (BSP)
Examples are provided with the ADuCM4050 DFP and BSPs and can be opened from the CMSIS Pack Manager Perspective Examples View.
- Open CMSIS Pack Manager perspective by clicking “Open Perspective” icon on tool bar and selecting “CMSIS Pack Manager” in the Open Perspective window (or choose CMSIS Pack Manager perspective if already open).
- From the Examples View, select the example that you would like to open.
- Click the Copy Action button.
- A dialog will pop-up showing the location where the example will be copied to. Click Copy to copy and open the example project.

The CCES Examples Browser can also be used to open examples by Help | Browse Examples.
- Select ADuCM4050_DFP[x.y.z] in Product drop-down list, select the example and click Open example. Then the example will be copied to your workspace.

How to Import Existing Projects from the GIT Repository
( Note that at the time of writing, the EV-COG-AD4050LZ GIT repo. is work In Progress )
- Open the GIT perspective by clicking “Open Perspective” icon on tool bar and selecting “Git” in the Open Perspective window (or choose the GIT perspective if already open).
- Clone the Git repository which contains all the latest code and projects associated with the ADuCM4050. Populate the URI field with the following address.
- Click Next, Next and then Finish. There may be a pause while the branches are fetched.
- In the Git Repositories window, Right Click on the Projects folder and select Import Projects…
- Select Import existing Eclipse projects
- Click Next and then Finish

How to build projects for programming the ADuCM4050
- Open the C perspective by clicking “Open Perspective” icon on tool bar and selecting C in the Open Perspective window (or choose the C perspective if already open).
- Right click on the project and select the Build Project.
- Or click the Hammer icon from the toolbar.

How to configure the Tools Settings used by an ADuCM4050 project
- Select the project in the Project Explorer View.
- Select the Cog icon from the View's toolbar.
- Or right-click on the project, select Properties and choose C/C++ Build | Settings.
- After configuring your project, click Apply and/or OK.

How to configure the debug session for an ADuCM4050 application
You will need to create a launch configuration to debug your ADuCM4050 program.
- If you have already built a project, select that project in the Project Explorer View.
- Right-click on the project and choose Debug As and Application with GDB and OpenOCD (Emulator)
- In the Target tab, choose Target (processor) and in the drop-down select Analog Devices ADuCM4050
- In the Target tab, choose Interface and in the drop-down select ARM CMSIS-DAP compliant adapter
- In the Main tab, ensure that your project is selected in the Project entry box.
- If the correct project is not populated, click the Browse… button and choose the project. Note that this is optional and you only need to choose a project if you want the IDE to search a project for the built binaries (programs), otherwise you can leave this entry blank.
- In the Main tab, ensure your binary (program) is selected in the Application entry box.
- If the correct binary (program) is not populated, click on Search Project… and choose the binary (program) from those available in the chosen project.
- If your binary (program) is not populated and it was not built from a project in your workspace (i.e. you have a pre-built binary), then click the Browse… button and search for your pre-built binary (program). Click Open when you have found and selected the pre-built binary (program).

How to start and stop debugging an ADuCM4050 application
- Ensure that you have connected your EV-COG-AD4050LZ board to your computer via the USB port (the micro USB connected closest to the DC barrel jack).
- If you are already in the Debug Configurations dialog, then click Debug.
- If you are in the C Perspective, then you can launch the last Debug session by clicking the Beetle Debug button on the toolbar.

- You will be prompted to switch perspective to the Debug perspective. Click Yes. You can opt to not show this dialog again.

- If your binary (program) was built with semi-hosting enabled, then CCES will warn you that you need to re-build the program when you want to run the program without a debugger attached.

- To disable semi-hosting in your program, visit your project Tools Settings.
- Change the semi-hosting support option under Linker | Libraries to nosys.specs or None, depending on whether or not your program is currently using semi-hosting (e.g. printf).
- After configuring your project, click Apply and/or OK.
- Right click on the project and select the Build Project.
- Or click the Hammer icon from the toolbar.

- If this is the first time you have launched OpenOCD, the Windows Firewall may pop-up a window asking for access. Click on “Allow Access”.

- If everything goes fine, in the Console window, you will see a report without errors.
- As a reference, the full text should be similar to:
Open On-Chip Debugger (OpenOCD) 0.9.0
Licensed under GNU GPL v2
Report bugs to <openocd-devel@lists.sourceforge.net>
0
Info : select transport "swd"
adapter speed: 1000 kHz
cortex_m reset_config sysresetreq
Info : CMSIS-DAP: SWD  Supported
Info : CMSIS-DAP: Interface Initialised (SWD)
Info : CMSIS-DAP: FW Version = 1.0
Info : SWCLK/TCK = 0 SWDIO/TMS = 1 TDI = 0 TDO = 0 nTRST = 0 nRESET = 1
Info : CMSIS-DAP: Interface ready
Info : clock speed 1000 kHz
Info : SWD IDCODE 0x2ba01477
Info : aducm4050.cpu: hardware has 2 breakpoints, 1 watchpoints
Info : CHIPID 0x0284
memory bus access delay set to 6 tck
adapter speed: 1000 kHz
Info : accepting 'gdb' connection on tcp/3333
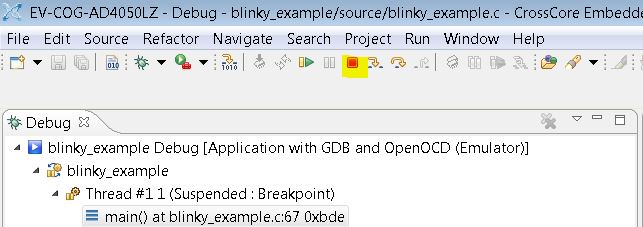
- Your program's execution is stopped automatically at the first breakpoint which is at the beginning of main() loop. You can use the debug functions and features of the CCES environment. (Such as stepping through, breakpoints, register reads, variable values, etc.)

- To terminate a debug session, click on the red Stop button on the toolbar.
How to create an Intel Hex (.hex) file from an ADuCM4050 application
- Ensure that your program is built with semi-hosting disabled by visiting Tools Settings | Linker | Libraries and change Semihosting support to nosys.specs or None, depending on your application set-up.
- Rebuild your application.
- Convert your application into Intel Hex (.hex) format by visiting Tools Settings once more.
- Select the Build Steps tab.
- Add the following command to the Post-build steps | Command entry box:
arm-none-eabi-objcopy -O ihex ${ProjName} ${ProjName}.hex - Rebuild your application.

End of Document
resources/ev/user-guides/ev-cog-ad4050lz/tools/cces_guide.1518512872.txt.gz · Last modified: 13 Feb 2018 10:07 by Pranit Jadhav