


This version (30 Jan 2023 09:18) was approved by Joyce Velasco.The Previously approved version (15 Apr 2022 15:12) is available.
Table of Contents
Linux Download and setting up the image
Download the file
- Download the relevant SD card image file from the AD-FMC-SDCARD for Zynq & Altera SoC Quick Start Guide page. Please get the latest if you can. This can be done with wget as well:
rgetz@brain:~/newest$ time wget https://swdownloads.analog.com/cse/kuiper/image_2021-07-28-ADI-Kuiper-full.zip
--2021-12-15 17:12:33--  http://swdownloads.analog.com/cse/image_2021-07-28-ADI-Kuiper-full.zip
Resolving swdownloads.analog.com (swdownloads.analog.com)... 81.196.26.153, 81.196.26.177
Connecting to swdownloads.analog.com (swdownloads.analog.com)|81.196.26.153|:80... connected.
HTTP request sent, awaiting response... 200 OK
Length: 15931539 (14.8 GB) [application/octet-stream]
Saving to: `image_2021-07-28-ADI-Kuiper-full.zip'

100%[=======================================================================>] 15931539 1.94M/s   in 6m 52s

2021-12-15 17:19:26 (1.83 MB/s) - `image_2021-07-28-ADI-Kuiper-full.zip' saved [15931539/15931539]


real	6m53.573s
user	0m0.740s
sys	0m32.342s
Yeah, it takes an hour (or more if your connection is slow). At least you can drive down to your favourite coffee store, and indulge yourself.
Verify the download
- Check the md5, to make sure you have the right file.
rgetz@brain:~/newest$ md5sum image_2021-07-28-ADI-Kuiper-full.zip
279097240dec7156ff5e15b7ce0b8a25 image_2021-07-28-ADI-Kuiper-full.zip
- A
zipfile is a compressed file, you need to uncompress it, and check the md5sum on resulted file:rgetz@brain:~/newest$ time unzip image_2021-07-28-ADI-Kuiper-full.zip real 1m17.40s user 74.44s sys 2.11s
- Again, check the results:
rgetz@brain:~/newest$ md5sum 2021-07-28-ADI-Kuiper-full.img
b160453396e482234094a92134769ec6 2021-07-28-ADI-Kuiper-full.img
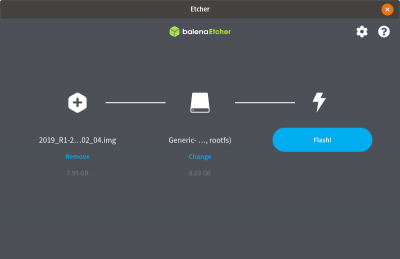
Writing SD Card GUI
This will overwrite your entire SD card completely. Backup anything from the card you want to keep.
It is recommended to use Etcher to write to your SD card but other options exist. Only the process for Etcher is covered here.
Insert your target SD card and launch Etcher. With Etcher:
- Select write image from file
- Select the .img file that you have already extracted
- Select the SD card that you inserted
- Click flash
- Wait for the card to be flashed and verified
At this point the SD card is still not bootable. Go back to Preparing the image.
Writing SD Card Command Line
This will overwrite your entire SD card completely. Backup anything from the card you want to keep.
Now that everything looks OK, write the file to your SD Card.
This will depend on your system, where your SD card installed itself. You also need to do this as root, since normal users shouldn't be able to randomly write files to block devices.
- plug the SD Card into your SD-Writer. If this mounts the device (which many Linux distributions do), it is important that you unmount it.
rgetz@brain:~/newest$ sudo umount /dev/mmcblk0p1
- Write the file (input file or
if) to the storage device (output file orof):rgetz@brain:~/newest$ time sudo dd if=2021-07-28-ADI-Kuiper-full.img of=/dev/mmcblk0 bs=4194304 [sudo] password for rgetz: 0+60640 records in 0+60640 records out 7948206080 bytes (7.9 GB) copied, 571.766 s, 13.9 MB/s real 7m54.11s user 0.29s sys 8.94s
Now, you have have that slice of pizza that you got too… :) - ensure the output buffers are flushed:
rgetz@brain:~/newest$ sync
- unplug the SD card from your PC.
Verify
Since it's possible that the write process of a disk image can have some issues (if the target had a sector marked as bad, dd will not notice, and write on top of it), the safest thing to do is to run a file system consistency check on things. If you are unsure of how to use this tool, check the man page.
Most Linux kernels will need to have a physical eject between the steps above, and the steps below.
- unmount the file systems (fsck will not work on a mounted file system)
rgetz@brain:~/images$ sudo umount /dev/mmcblk0p1
rgetz@brain:~/images$ sudo umount /dev/mmcblk0p2
. If this errors, with aumount: /dev/mmcblk0p2: not mounted, that's OK. If it errors withumount: /dev/mmcblk0p2: not found, that means you have no disk inserted, or did a typo in the path. - perform the file system consistency check:
rgetz@brain:~/images$ sudo fsck -y /dev/mmcblk0p1
fsck from util-linux 2.20.1
dosfsck 3.0.13, 30 Jun 2012, FAT32, LFN
/dev/mmcblk0p1: 158 files, 76420/130812 clusters
rgetz@brain:~/images$ sudo fsck -y /dev/mmcblk0p2
fsck from util-linux 2.20.1
e2fsck 1.42.5 (29-Jul-2012)
/dev/mmcblk0p2: clean, 157918/452480 files, 717760/1808128 blocks
At this point the SD card is still not bootable. Go back to Preparing the image.
resources/tools-software/linux-software/zynq_images/linux_hosts.txt · Last modified: 30 Jan 2023 08:56 by Joyce Velasco