The ADXRS453 is an angular rate sensor (gyroscope) intended for industrial, instrumentation, and stabilization applications in high vibration environments. An advanced, differential, quad sensor design rejects the influence of linear acceleration, enabling the ADXRS453 to offer high accuracy rate sensing in harsh envi-ronments where shock and vibration are present. This reference design allows full programming of the device, and also includes monitoring rotation angles on Z-Axis and printing them on the UART.
Two reference designs are available for this part:
The bit file provided in the project *.zip file combines the FPGA bit file and the SDK elf files. It may be used for a quick check on the system. All you need is the hardware and a PC running a UART terminal and the programmer (IMPACT).
If you are not familiar with LX9 and/or Xilix tools, please visit
products/boards-and-kits/AES-S6MB-LX9.htm for details.
If you are not familiar with Nexys™3 and/or Xilix tools, please visit
http://www.digilentinc.com/Products/Detail.cfm?NavPath=2,400,897&Prod=NEXYS3 for details.
If you are not familiar with ZedBoard and/or Xilix tools, please visit
http://www.em.avnet.com/en-us/design/drc/Pages/Zedboard.aspx for details.
Extract the project from the archive file (ADXRS453_<board_name>.zip) to the location you desire.
To begin, connect the PmodGYRO2 to J5 connector of LX9 board, pins 7 to 12 (see image below). You can use an extension cable for ease of use. Connect the USB cable from the PC to the USB-UART female connector of the board for the UART terminal. The board will be programmed through its USB male connector.
Extract the project from the archive file (ADXRS453_<board_name>.zip) to the location you desire.
To begin, connect the PmodGYRO2 to JA connector of Nexys™3 board, pins JA1 to JA6 (see image below). You can use an extension cable for ease of use. Connect the USB cables from the PC to the board, one for programming (Digilent USB device) and one for the UART terminal (FT232R USB UART).
To begin, connect the PmodGYRO2 to JA1 connector of ZedBoard (see image below). You can use an extension cable for ease of use. Connect the USB cables from the PC to the board, one for programming (Digilent USB device) and one for the UART terminal (FT232R USB UART).
Start IMPACT, and double click “Boundary Scan”. Right click and select Initialize Chain. The program should recognize the Spartan 6 device (see screenshot below). Start a UART terminal (set to appropiate baud rate) and then program the device using the bit file provided in the project *.zip archive, located in the “sw” folder (../adxrs453/sw/ADXRS453.bit).
Run the download.bat script from the “../bin” folder downloaded from the github (see the links in the download section of the wiki page). The script will automatically configure the ZYNQ SoC and download the *.elf file afterwards.
If the download script fails to run, modify the Xilinx Tools path in download.bat to match your Xilinx Installation path.
If programming was successful, you should be seeing messages appear on the terminal window as shown in the figure below. After programming the ADXRS453 device, the program will automatically send the recommended initialization sequence. Once complete, it will start to print current angles/second rotation on Z-Axis on the UART.
Information displayed in the Terminal Screen is in Degrees/Second, representing the rotation described by the Pmod around the marked Axis in the past second. If you rotate the Pmod slowly, you will see a smaller value (e.g. 30 Degrees/Second), while rotating the Pmod at a higher speed will result in a higher value (e.g. 300 Degrees/Second). Afterwards the device will auto calibrate according to its new position, thus displaying a value close to 0 Degrees/Second.
The reference design is a simple SPI interface for the ADXRS453. The software programs the device and monitors vibrations or rotations. The information is displayed on UART.
The hardware SPI access allows reading or writing of any ADXRS453 registers via the address, write and read data registers.
When using the ZedBoard reference design in order to develop your own software, please make sure that the following options are set in “system_config.h”:
// Select between PS7 or AXI Interface
#define USE_PS7 	 1
// SPI used in the design
#define USE_SPI		 1
// I2C used in the design
#define USE_I2C		 0
// Timer (+interrupts) used in the design
#define USE_TIMER	 0
// External interrupts used in the design
#define USE_EXTERNAL     0
// GPIO used in the design
#define USE_GPIO         0
Avnet LX-9 MicroBoard:
Digilent Nexys™3:
Avnet ZedBoard:
====== Linux Device Driver ======
Connect PmodGYRO2 to the JA1 connector of the ZedBoard (upper row of pins).
===== Preparing the SD Card =====
In order to prepare the SD Card for booting Linux on the ZedBoard:
* Download the device tree: PmodGYRO2 Linux devicetree
* Follow the instructions on the following wiki page, but use the device tree downloaded on the previous step
* Linux with HDMI video output on the ZED and ZC702.
Make sure you have an HDMI monitor connected to the ZedBoard, plug in the SD Card and power on the board.
If everything is correct, the system should boot up. If you don't have an HDMI monitor, connect to the board via UART, Baud Rate 115200.
There are 2 ways to test the driver.
* Using the terminal window
* Using a serial terminal
===== Using the terminal window =====
Open a new terminal window by pressing Ctrl+Alt+T.
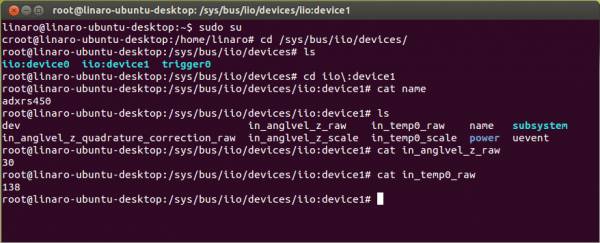
Navigate to the location of the device and identify it using the following commands:
<code>
cd /sys/bus/iio/devices/
ls
iio:device0 iio:device1 trigger0
cd iio\:device0
cat name
adxrs450
</code>
If the cat name command doesn't return adxrs453, then change the number of the iio:device, and check again.
<code>
cd ..
cd iio\:device1
cat name
</code>
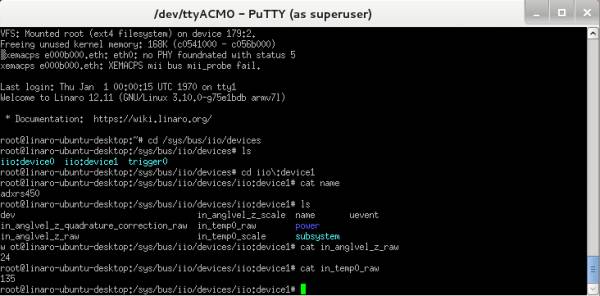
To see the list of options that the ADXRS453 driver provides, type:
<code>
ls
dev in_anglvel_z_scale name uevent
in_anglvel_z_quadrature_correction_raw in_temp0_raw power
in_anglvel_z_raw in_temp0_scale subsystem
</code>
To read the raw Z angle, type:
<code>
cat in_anglvel_z_raw
24
</code>
To read the raw temperature, type:
<code>
cat in_temp0_raw
135
</code>
 The commands written above can also be used if not using an HDMI monitor and a wireless keyboard, by using a serial terminal, and typing the commands after the system boot-up is complete.

The bit file provided in the project *.zip file combines the FPGA bit file and the SDK elf files. It may be used for a quick check on the system.
If you are not familiar with LX9 and/or Xilix tools, please visit
products/boards-and-kits/AES-S6MB-LX9.htm for details.
To begin, connect the PmodGYRO2 to J5 connector of LX9 board, pins 7 to 12. You must use an extension cable or the Pmod-TPH (Digilent). Afterwards connect PmodACL to connector J4 of the LX9 Board (see image below).
Start IMPACT, and double click “Boundary Scan”. Right click and select Initialize Chain. The program should recognize the Spartan 6 device (see screenshot below). Program the FPGA using the download.bit file provided in the project *.zip archive, located in the “sw” folder (../adxrs453_adxl345/sw/download.bit).
Start a Hyperterminal program (Tera Term, puTTy, etc.), select the proper COM Port (look for the COM Port named Silicon Labs CP210x USB to UART Bridge in Windows Device Manager). Select 57600 Baud Rate and Odd Parity. You should start seeing messeges in the Terminal Window, displayed on 4 columns, representing the rotation of the board in Degrees per Second, and the acceleration in g on each axis.
On the LX-9 MicroBoard D10 and D9 display the Tap/Double Tap status. If you tap the device once, D10 will turn on for a short period of time. If you double tap the device, D10 and D9 will both turn on at the same time.