


This version (29 Jul 2021 06:06) was approved by Harvey John De Chavez.The Previously approved version (28 Jan 2021 23:43) is available.
Table of Contents
Ultra-Low Power Standalone Motion Switch (CN0274)
Overview
The ADXL362 is a tri-axis, ultra lower power digital accelerometer capable of detecting motion depending on user defined activity and inactivity thresholds. Unlike accelerometers that use power duty cycling to achieve low power consumption, the ADXL362 does not alias input signals by under sampling, it measures continuously at all data rates. By mapping activity and inactivity detection to the interrupt pins, the user can drive the enable pin of an ADP195. When activated, this logic controlled switch provides power to downstream circuitry. All communications to the accelerometer are performed using a Serial Peripheral Interface (SPI).
General Setup
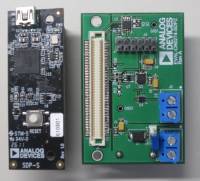
- EVAL-CN0274-SDPZ Evaluation board.
- EVAL-SDP-CS1Z Evaluation board
- Power Supply: 2 AAA batteries or +3.0V supply.
- 1 USB Type-A plug to USB Mini-B plug cable

Minimum PC/System Requirements
- One PC with the following
- Windows XP SP2, Windows Vista or Windows 7 Business/Enterprise/Ultimate editions
- Intel Pentium processor (x86 compatible), 1GHz or faster
- 512 MB RAM and 2 GB available hard disk space
- .NET 3.5 Framework
How to Install the Evaluation Software
- Extract the files within the file CN0274 SDP Eval Software.zip and open the file setup.exe. It is recommended that you install the CN0274 SDP Evaluation Software to the default directory path C:\Program Files\Analog Devices\CN0274\ and all National Instruments products to C:\Program Files\National Instruments\

- Press “Next”.

- Press “Next”.

- Press “Next”.
- Upon completion of the installation of the CN0274 SDP Eval Software, the installer for the ADI SDP Drivers will execute. Follow the on-screen prompts to install the drivers. It is recommended that you close all other applications before clicking “Next”. This will make it possible to update relevant system files without having to reboot your computer.


- Press “Next”.
- It is recommended that you install the drivers to the default directory path C:\Program Files\Analog Devices\SDP\Drivers\
- Press “Next” to install the Drivers and complete the installation of all software necessary to evaluate the EVAL-CN0274-SDPZ


Step by Step Instruction for Connecting the Hardware
- Place two batteries into the connector on the bottom of the EVAL-CN0274-SDPZ board, ensure the batteries are size triple A and are the correct polarity.


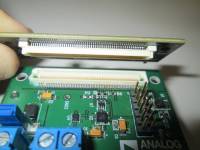
- Connect the EVAL-SDP-CS1Z and the EVAL-CN0274-SDPZ PCB’s using the 120 pin male and female connectors found on the respective boards.

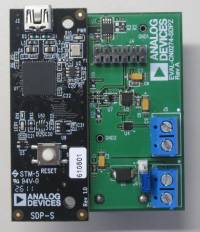
- Plug the mini end of the USB cable into connector J2 of the EVAL-SDP-CS1Z. And connect the other end of the USB cable into the Laptop or PC.


Opening and Enabling the Evaluation Software
- Launch the executable found at C:\Program Files\Analog Devices\CN0274 and press the “Connect“ button.

- After pressing the “Connect” button, a prompt will appear informing the user if the accelerometer was properly configured. Press “Ok” and the software is ready to use. If the accelerometer is not configured properly, disconnect the entire setup and start over.


Step by Step Instruction to Using the Evaluation Software
- The following is a list of all available software controls, grouped according to their location in the software:
- System Controls
- Connect – This button configures the ADXL362 by writing to the necessary registers. A prompt will appear informing the user if the accelerometer was properly configured.
- Disconnect – This button will disconnect the EVAL-CN0274-SDPZ board.
- Data Acquisition Controls
- Start Sampling – This button polls the data ready bit in the ADXL362 status register. When this bit is set, LabVIEW reads the data registers and displays the acceleration data for each axis on the chart found in the evaluation software.
- Stop Sampling – This button stops LabVIEW from reading and displaying acceleration data.
- Save Data – This button saves all data displayed in the LabVIEW chart.
- Note: Data will still be saved even if the display is disabled.
- Accelerometer Controls
- Activity Threshold – This control sets the Activity threshold for all axes of the ADXL362. When looking for activity, any single sample that crosses this threshold will wake the accelerometer and cause it to begin searching for inactivity.
- This threshold is an absolute value; it is not referenced to acceleration reading.
- Inactivity Threshold – This control sets the Inactivity threshold for all axes of the ADXL362. When looking for inactivity, a number of samples (defined by the user ) must cross this threshold in order for the accelerometer to sleep and cause it to begin searching for activity.
- This threshold is referenced to the acceleration reading. For example, if the acceleration reads 0g, and the Inactivity threshold is set for 0.5g, the chart will display one solid line (the acceleration reading) and two dotted lines (the acceleration reading +/- 0.5g).
- Inactivity Time (Samples) – This control sets the number of acceleration samples for all three axes that must be inside of the threshold window for the ADXL362 to enter the asleep state.
- Measurement Range (g’s) – This control sets the measurement range of the ADXL362 in g’s. Choices are ±2g, ±4g, ±8g.
- Acceleration Data Plots - This final section is the main tab of the software. It contains a chart which graphically displays acceleration data for each axis as well as a numerical display showing the most recent acceleration conversion for each axis. Lastly there is an LED indicating the current state of the device (Active-Green or Inactive-Red).
- X-Axis Plot Disabled/Enabled- This control disables or enables the graphical display for the X-axis.
- Y-Axis Plot Disabled/Enabled- This control disables or enables the graphical display for the Y-axis.
- Z-Axis Plot Disabled/Enabled- This control disables or enables the graphical display for the Z-axis.
Registration
Receive software update notifications, documentation updates, view the latest videos, and more when you register your hardware. Register to receive all these great benefits and more!
resources/eval/user-guides/circuits-from-the-lab/cn0274.txt · Last modified: 29 Jul 2021 06:06 by Harvey John De Chavez